TUTORIAL - ANDROID-STEP2
Table of contents
1. Introduction
1.1 Network model
1.2 Prerequisites
2. Installation of the "Sensor" application
3. Operation of the "Sensor" application
3.1 Screen transitions
3.2 Initial screen
3.3 Settings screen
3.3.1 Settings for Sensors
3.3.2 Settings for the SINETStream
3.4 Main screen
3.4.1 Layout of the main screen
3.4.2 Publishing sensor data
4. Set location information of the Android device
5. Operational hints
5.1 Keep broker connection even under poor radio conditions

Appendix
A.1 Source code
A.2 Known problems
1. Introduction
We implemented an Android application “Sensor”, as a sample usage of the Android SINETStream library and SINETStreamHelper library. The application collects the readout values of the Sensor devices, then send them as a message over the SINETStream. In this document, we briefly describe how to install this application to an Android device, how to setup and operate it.
1.1 Network model
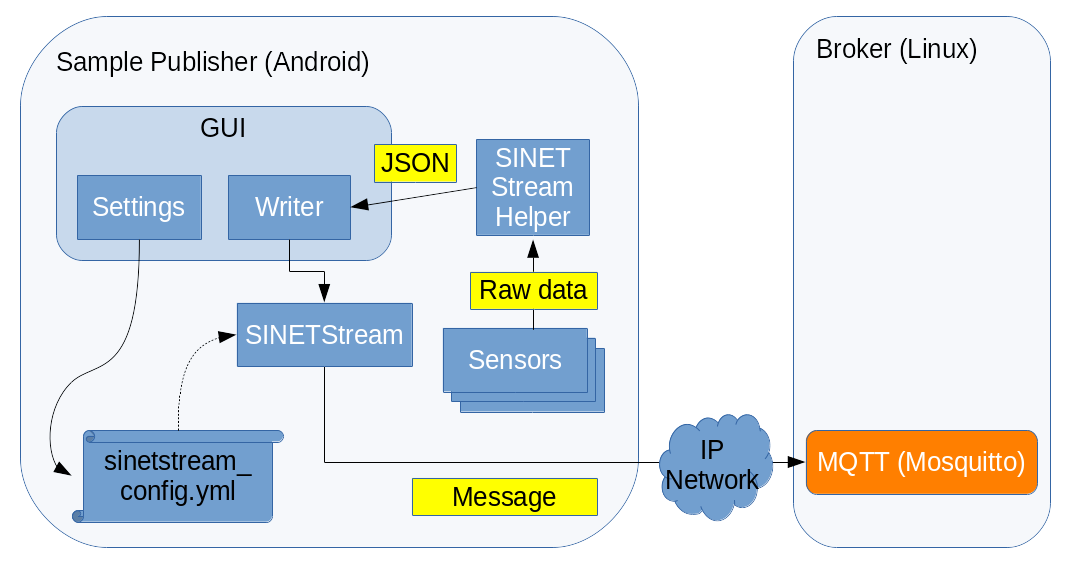
The “Sensor” application has only Writer functionality.
This application uses the
SINETStreamHelper library
to collect sensor readout values in JSON format. Then the JSON data
will be sent to the peer Broker as a SINETStream message.
On the other hand, the back-end system behind the Broker parses
the JSON contents and stores it in the database. User can view the
plotted sensor data via Web interface.
The “Sensor” application has its own “Settings” screen, and thus user
can set configuration parameters such like the Broker connection
or the SINETStream behaviors.
Once user has set those parameters, the Android
SINETStream configuration file
will be automatically generated.
1.2 Prerequisites
-
The Android device
- Android 8.0 (API level 26) or later
- The Android SINETStream library uses the MQTT(Eclipse Mosquitto) as a underlying messaging system.
- The implementation of the
Paho MQTT Android Client
requires
Android 8.0+as its running condition.
- Android 8.0 (API level 26) or later
-
Preparations for the back-end system
- Within the scope of this tutorial, we just need a peer
Brokerwhich communicates with an Android device. - On the host machine for the back-end system, run
docker runcommand which installs the container image for this tutorial. Server processes will be automatically started afterward. - The back-end system should be up and running before working on the Android device.
- Back to the previous document and see the section 3.1 Works on the back-end side (part 1) for details.
- Within the scope of this tutorial, we just need a peer
-
Network environment
- The Android device and the peer
Brokeris connected via IP (Internet Protocol) network. Make sure the end-end IP reachability via cellular or Wi-Fi network.
- The Android device and the peer
2. Installation of the “Sensor” application
Currently, the “Sensor” application will be available from the NII managed server, not from Google Play.
Please see the companion document Installation of the sample Android application for details. The procedure is the same for updating the older version.
3. Operation of the “Sensor” application
3.1 Screen transitions
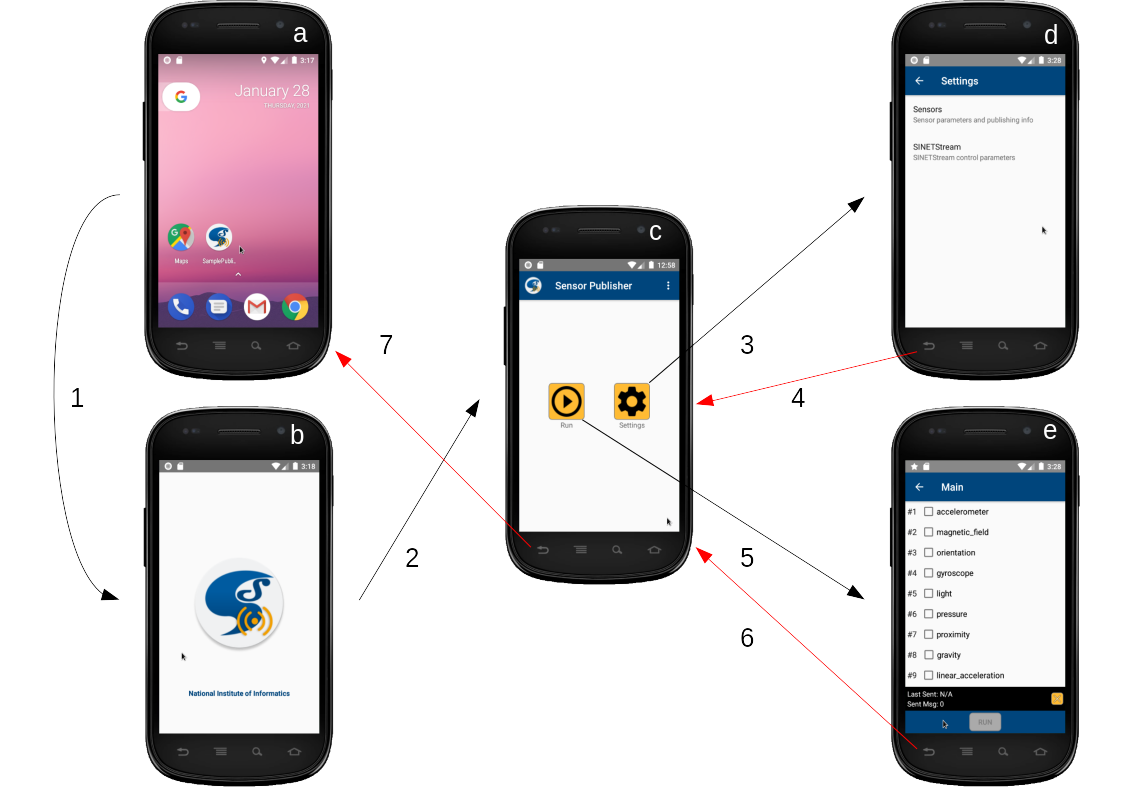
<Legend>
- On the Android home (a), press the icon
Sensorto start. - On the splash screen (b), application icon and the copyright holder will be briefly shown. Then the screen transits to the initial one (c).
- Pressing the button
Settingscauses the initial screen (c) transit to the settings screen (d). - Pressing the button
BACKcauses the settings screen (d) transit to the initial screen (c). - Pressing the button
Runcauses the initial screen (c) transit to the main screen (e). - Pressing the button
BACKcauses the main screen (e) transit to the initial screen (c). - Pressing the button
BACKcauses the initial screen (c) transit to the Android home (a).
In the latter part of this document, each screen layout and operation details will be addressed.
3.2 Initial screen
This is the initial screen after application startup.
Runbutton- Start the
MainActivity of this application. - Once the main screen finishes, control comes back to this screen.
- Start the
Settingsbutton- Start the
SettingsActivity for this application. - Once the settings screen finishes, control comes back to this screen.
- Start the
- Menu button
- By pressing the “vertical 3-dots” on the top right corner,
a small menu will be deployed.
Help: Show help for this application.About: Show brief information about this application.
- By pressing the “vertical 3-dots” on the top right corner,
a small menu will be deployed.
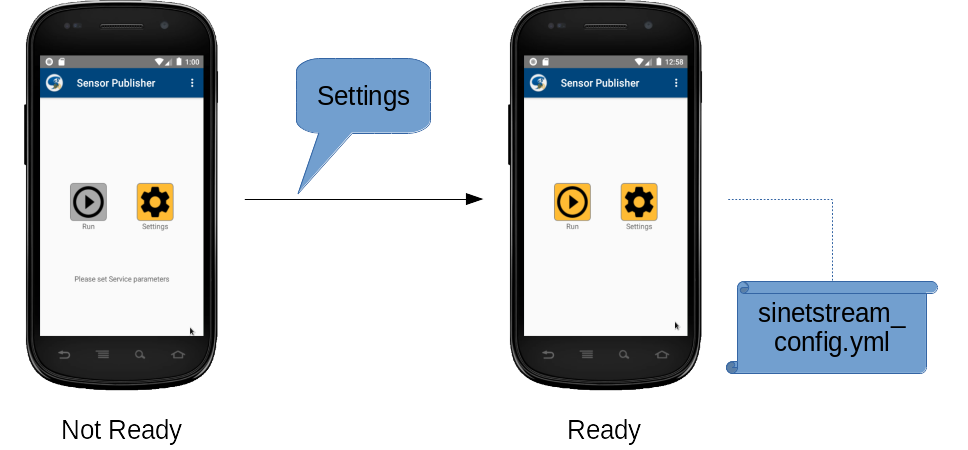
If the
SINETStream configuration file
does not yet exist (just like after the fresh installation),
or if current configuration does not meet the mandatory conditions,
Run button is set disabled (gray out) and a guide message will be
shown to let user take actions.
In these cases, press the Settings button and fill-in the mandatory
SINETStream parameters.
3.3 Settings screen
The settings screen is being split for Sensors and SINETStream, where both of those are hierarchically deployed.
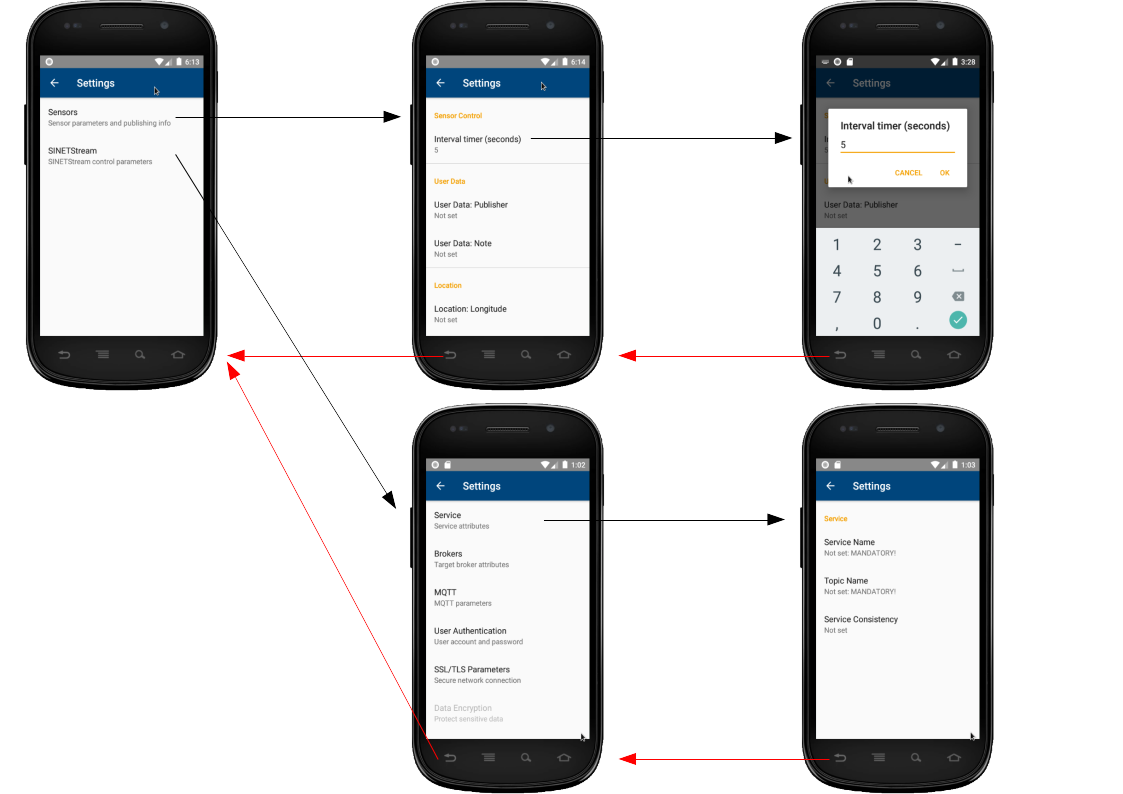
3.3.1 Settings for Sensors
The sensor readout values from the Android device will be formatted as JSON data, which is defined in the companion document SINETStreamHelper#JSON data format.
As for the DeviceInfo element of the above JSON format, User Info and
Location values (both are optional) must be externally specified.
- User Info
- Multiple Android devices running this “Sensor” application may
connect to the same
Brokerwith the same topic name. If so, it is convenient to have sender identification information. - The sub-item
Publisherdescribes the sender information, andNotesdescribes supplementary information.
- Multiple Android devices running this “Sensor” application may
connect to the same
- Location
- This item represents the geographic location (latitude, longitude) of the Android device running this “Sensor” application.
- As of version 1.5, this item is provided for setting the initial value manually. Automatic setting and updating is not supported.
Note that user can set an optional item Interval timer
(default value is 10 seconds).
Its intention is as follows.
The readout values of active sensor devices will be asynchronously notified by the Android system SensorManager, but those timing differs per sensor types. Some are continuously notified, and others are notified only at the value changes. Therefore, if you activate multiple sensor devices at the same time, you will likely to get frequent notifications.
To suppress the network overload, each sensor readout values are
cached in the
SINETStreamHelper library
as the latest ones. At the certain sampling timing (not shorter
than Interval timer), JSON data is generated in the library.
    [SensorA] [SensorB]
       |         :
       +-----------------++---------------+
       |         :       ||               |
       |   ......:.......||...............|..
       |   :          :  ||   :    :      | :
       V   V          V  VV   V    V      V V

   ----o---x----------o--xx---x----o------x-x---------> t
       |<-------->|   |            |
       |    T         |<-------->| |
       V              |    T       |<-------->|
      JSON#1          V            |    T
                     JSON#2        V
                                  JSON#3
The figure showed above depicts the timing relationship of two events.
- The notification timing (o/x) from the Android system for sensor readout values (in this case, two sensors A/B)
- The timing (o) that JSON data is actually generated
In the first place, the notification timing of each sensor readout values is not periodic.
Assume that a JSON data is generated at “o”, any sensor readout values notified at “x”, which is shorter than “o + T”, are simply cached as the latest value of the sensor type without generating a JSON data.
If the next notification timing is equal or longer than “o + T”, new JSON data is generated by collecting the latest values per sensor type (values at “o” and the last “x”).
{
   ...
   "sensors": [
     { # Sensor A with a scalar value
         ...
         "timestamp": "20210101T012312.345+0900",  # Timing 'x'
         "values": 1
     },
     { # Sensor B with vector values
         ...
         "timestamp": "20210101T012345.678+0900",  # Timing 'o'
         "values": [
           1.0,
           -2.3,
           4.5
         ]
     }
   ...
   ]
}
To summarize, the minimum interval of SINETStream messages sent
from this “Echo” application to the Broker is restricted by the
value “T” (settings item Interval timer).
3.3.2 Settings for the SINETStream
To use the Android
SINETStream library,
its own
SINETStream configuration file
must be set properly, so that the user application using the library
can connect to the peer Broker.
We provide a GUI-based settings screen for this purpose.
On the initial screen, press the Settings button to transit to
the settings screen. Before coming back to the initial screen after
several settings operations, the SINETStream configuration file
will be automatically generated.
If there are some configuration changes from the previous settings,
the file contents will be updated.
Following items must be set to connect to the Broker.
Other items can be left untouched. If so, program default values
will be used.
- Service Name:
Service -> Service Name - Topic Name:
Service -> Topic Name Brokerconnection information (Address, Port)Brokers -> IP Address (or FQDN)Brokers -> Port Number
In the case of the Broker shown in this tutorial, above mandatory
parameters would look like as follows. Note that actual Broker
address must be set according to the running environment.
| Service Name | Topic Name | IP Address (or FQDN) | Port Number |
|---|---|---|---|
| service-tutorial-mqtt | sensor-data | xx.xx.xx.xx | 1883 |
Note that the
Topic Nameis a string used as a communication channel identifier. User can set any value for it, but in the STEP2 context, beware to exactly set the reserved word “sensor-data” as is. OnBrokerside, theTopic Nameis treated as the filter to pass the received SINETStream message to the back-end system. If theTopic Namedoes not match with “sensor-data”, received JSON data dos not stored in the database, and thus the graph does not updated.
3.4 Main screen
On the initial screen, press the button Run to transit to the
main screen which controls the publishing of sensor readout values.
3.4.1 Layout of the main screen
In the middle of the screen is the list of sensor types, the black belt under the screen is the statistics panel, and the lowermost blue belt is the control panel.
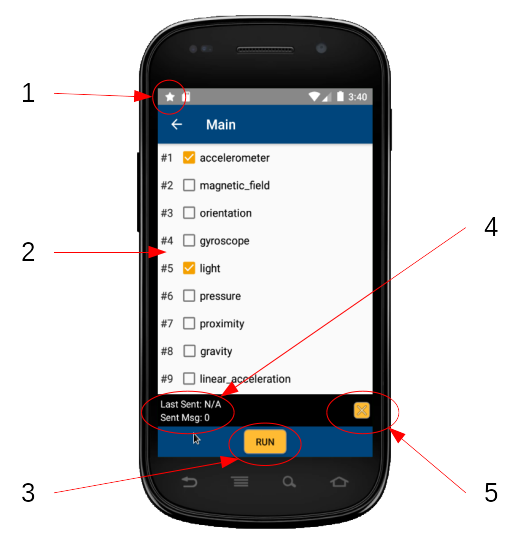
<Legends>
- Sensor status indicator
- The star icon shows that the internal
SensorServiceof the SINETStreamHelper library is up and running.
- The star icon shows that the internal
- List of sensor types
- The list of sensor types implemented on the Android device is displayed.
- By picking up the desired sensor types, the
RUNbutton on the bottom of the screen is set enabled.
- The execution (RUN/STOP) button
- Disabled at initial status. Enabled if any sensor type is selected.
- By pressing the
RUNbutton, target sensor devices are activated and start sending the sensor readout values to theBroker. - To avoid mishandling, additional operations for pickup or release
of sensor types are blocked during
RUNstate. - By pressing the
STOPbutton, all sensor devices are deactivated and user can pickup desired sensor types again.
- Statistics information
- During the
RUNstate, following statistics values will be updated.- The date-time of the last sent
- The number of sent messages
- During the
- Statistics reset button
- Disabled during the
RUNstate.
- Disabled during the
3.4.2 Publishing sensor data
The sensor data publishing process are controlled as follows.
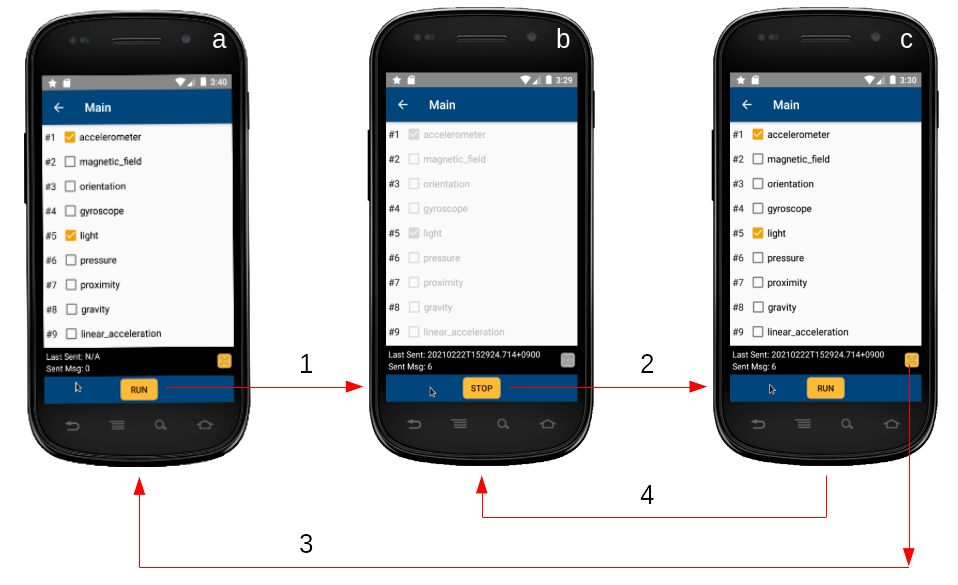
<Legends>
- Pickup desired sensor types (a), then press
RUNbutton to start. - During
RUNstate (b), statistics information will be updated. Those values remain after pressing theSTOPbutton. - If not in
RUNstate (c), statistics can be cleared by pressing the reset button. - You can restart while holding the previous statistics information.
4. Set location information of the Android device
User may want to embed the Android device location as a part of JSON data being sent from the “Sensor” application.
If the Android device is installed somewhere on a fixed place, user can set the known geographic location (latitude, longitude) of the place manually. And if the device is expected to move around, it is convenient to enable the automatic location update mode.
Please see the companion document TUTORIAL - Automatic update of the device location data for details.
5. Operational hints
5.1 Keep broker connection even under poor radio conditions
As the nature of mobile communication, radio signal conditions change all the time. That is, even after the broker connection has established, message transmission might stalled at some time. Even worse, the broker connection might be closed due to no responses from peer.
As mentioned earlier, the Android
SINETStream library
uses the
MQTT(Eclipse Mosquitto)
as a underlying messaging system.
Namely,
Paho Android Service
, which is a MQTT client library for Android.
The library features the monitoring of the broker connection status.
When the MQTT client library detects a connection failure, the “Sensor” application immediately aborts the program as the default behavior.
However, user can adjust parameters of the
MqttConnectOptions
so that the MQTT client library try to keep the connection up and running.
Please try following measures.
| No. | Method | Expected effects | Setting route |
|---|---|---|---|
| 1 | Enable automatic reconnect | If the broker connection has lost, restart connect attempts repeatedly | Settings -> MQTT -> MQTT Connect -> Enable Automatic Reconnect |
| 2 | Extend the keep alive interval timer | Adjust sensitivity against temporary communication link failure | Settings -> MQTT -> MQTT Connect -> Keep Alive Interval |
| 3 | Extend the connection establishing wait timer | Same as above | Settings -> MQTT -> MQTT Connect -> Connection Timeout |
| 4 | Enable the MQTT message sending queue | Allow user to call next send request without waiting for the completion | Settings -> MQTT -> MQTT Protocol -> MQTT InFlight -> Enable Max InFlight Messages |
| 5 | Expand the slot of the MQTT message sending queue | Absorb temporally MQTT message congestions | Settings -> MQTT -> MQTT Protocol -> MQTT InFlight -> InFlight |
Note that there are some cases that above MqttConnectOptions adjustment does not work.
- Broker connection parameter is wrong at the first place.
If automatic reconnect is enabled, false reconnect attempt continues indefinitely. Please abort the “Sensor” application by “Swipe upwards” operation. See "Close apps" for details.
- Broker application has abnormally terminated.
- Running environ which hosts the broker application has restarted or stopped.
If the “Sensor” application tries next reconnect without success, the program will terminates as an irrecoverable error.
Note also that once the MQTT message sending queue slot (which has set by No. 4 and 5) has exhausted, following send requests will be ignored. If some slot has reopened afterward, application can issue send requests again.
Appendix
A.1 Source code
The source code of this application is open and available from GitHub. If you found something wrong, please contact us.
If you need to modify the source code, install the Android development environment Android Studio to your working machine, and load the source code.
A.2 Known problems
-
Implementation status of information security
Functionality Item Status User Authentication DONE SSL/TLS communication DONE Data encryption/decription Work in progress -
The mapping of the GUI
Settingsand the SINETStream configuration file- The GUI
Settingsdoes not fully cover the items described in SINETStream configuration file.
- The GUI