TUTORIAL - STEP2: Publish Sensor readout values
Table of contents
1. Introduction
2. System configuration
3. The flow of work
3.1 Works on the back-end side (part 1)
3.2 Works on the Android side
3.3 Works on the observing PC side
3.4 Works on the back-end side (part 2)
4. Restrictions
5. If something goes wrong
5.1 Want to reset the Android application settings
5.2 The Android application cannot connect to the `Broker`
5.3 An error dialog is shown while the Android application is running
5.4 Graph cannot be displayed on the web interface
1. Introduction
As the second step of a sample program which uses the Android SINETStream library, we demonstrate a little bit complex system configuration.
Android device normally equips sensor devices such like accelerometer or illuminometer, and also has means to connect to the network. Therefore, we build a system in which an Android device collects sensor readout values and periodically send them to the cloud for data visualization.
2. System configuration
In this scenario, we do not use Reader functionality.
As shown in the figure below, we use an Android application “Sensor”,
which works as a Writer. Along with a Broker, application server
functions are used on the back-end side.
The application collects sensor readout values on the Android device,
and send them as a message to the Broker via SINETStream. Then the
message is processed in the back-end side for data visualization.
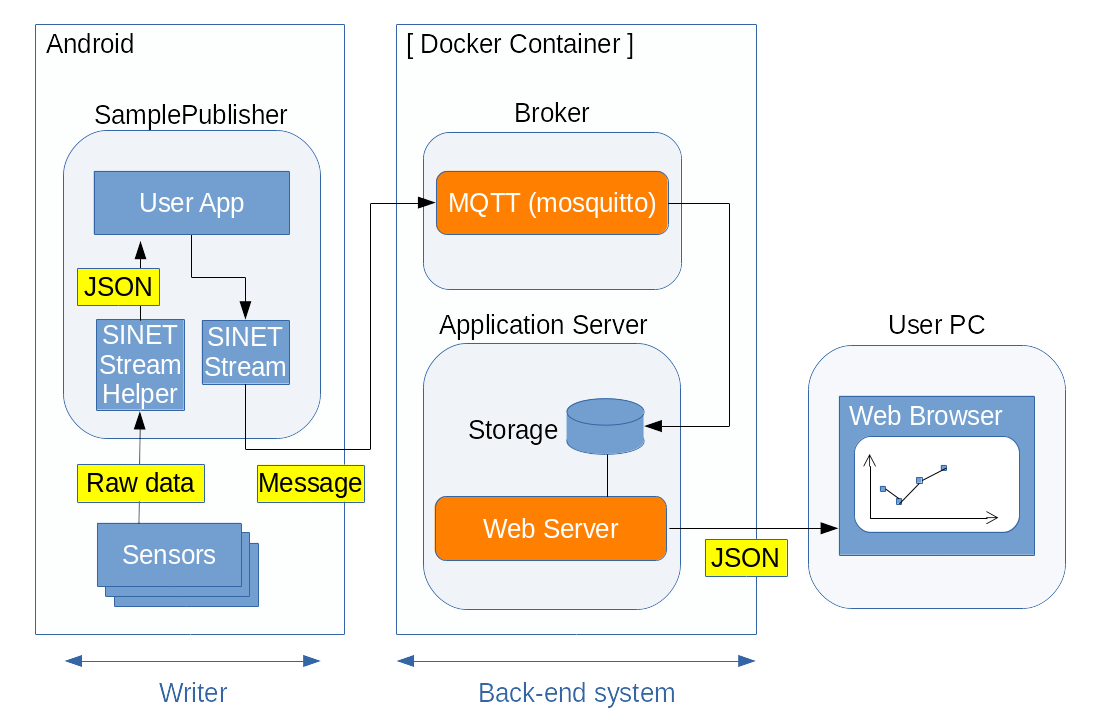
For better readability of this tutorial, we describe details per functional elements as follows in the latter part of this document.
- Works on the back-end side
- Works on the Android side
- Works on the observing PC side
Please proceed along with those descriptions.
Once you went through the running environment installations,
you need to fill-in the connection settings between the Android and
the Broker, before actually run the Android Application.
Please set parameters to fit with your network configurations.
3. The flow of work
3.1 Works on the back-end side (part 1)
We start from how to build a virtual running environment on a host machine, which can be either commercial cloud service or on your desktop computer. Then we also describe how to install, setup and operate of the server programs.
On the host machine, install the Docker Engine at first.
See Install Docker Engine
for the installation procedure.
Then execute docker run to install the container image for STEP2
and start all required server programs.
% sudo docker run -d --name broker -p 1883:1883 -p 80:80 harbor.vcloud.nii.ac.jp/sinetstream/android-tutorial:latest
The arguments of the
docker runcommand above specify the container name asbroker, and open two TCP ports: 1883 (MQTT) and 80 (HTTP). If you need to change the listening port numbers, adjust the-poption values accordingly.
With this docker run command, installation of the back-end system
and starting of server processes are automatically executed.
The source code for the container image is here.
3.2 Works on the Android side
We describe procedures such like installation, settings and operations of the Android application “Sensor”.
See the companion document TUTORIAL - Android:STEP2 for details.
3.3 Works on the observing PC side
Once the back-end system has started as mentioned above, a web server for the data visualization listens for the incoming connection. From a web browser on an observing PC, connect to the following URL.
http://<server_address>/
For the server_address of the URL, specify the host machine
which runs the container image for the back-end system.
As for the port number of the web server, 80 is used as default.
If you need to change it, adjust by the argument “-p” of the
docker run command.
As for the topics on the web interface, such like graph layout or preferences of those elements, see the companion document TUTORIAL - A web interface for the sensor data visualization for details.
3.4 Works on the back-end side (part 2)
Once you have done this tutorial, computational resources for it must be freed. Please stop and remove the container image with the following commands.
If the Android application is still running, you will see an error dialog “EOF exception”, because the connection is closed by
Brokershutdown.
     % sudo docker stop broker
     % sudo docker rm broker
See Docker CLI reference for details on the container stop and removal commands.
4. Restrictions
Because of the nature of tutorial which aims to experience
the system behavior, this tutorial does not fully cover the
Android SINETStream library functionalities.
If you use the Broker shown in this tutorial, beware that
there are some functional restrictions as follows.
- Connection method with
Broker- The Android application connects to the
Brokerwith the simplest way; no user authorization, no SSL/TLS, no encryption.
- The Android application connects to the
- Use of fixed topic name
- The back-end system behind the
Brokerextracts the received message with the fixed topic namesensor-dataas the search key. - Note that even in the topic name mismatch cases, the message
can be received by the
Brokerbut is not processed by the back-end system.
- The back-end system behind the
- Collecting sensor data
- Depending on the hardware implementation or Android version, available sensor types may vary.
- Depending on the Android system settings or the application “Sensor” settings, desired sensor type values may not be notified and thus the graph is not being updated.
- Graph display
- For the sake of simple processing, the
Brokerdoes not distinguish each Android clients. Actually, multiple Android clients can connect to the sameBrokerat the same time. In that case, plotted data are mixed ones from all Android clients. - For the sake of simple processing, sensor types generating vector values (such like accelerometer) get special treatment. Vector norm is calculated and displayed as a scalar value.
- For the sake of simple processing, the
Note:
There are 3 types in vector norm calculation.
- One-dimensional norm
- Sum of absolute value of each element
- Euclidean (2-dimensional) norm
- Square root of “Sum of squared value of each element”
- Maximum norm
- Maximum of absolute value of each element
In this tutorial, we take euclidean (2-dimension) norm.
5. If something goes wrong
5.1 Want to reset the Android application settings
- Reset everything to restart from scratch.
- Exercise the following steps to clear local data of the application.
- There are two kind of areas,
Storage(orDATAin older Android versions) andCache. - We need to clear
Storagearea for reset operation.
    Settings
    --> Apps & notifications
      --> App info
        --> Sensor
          [FORCE STOP]
          --> Storage & cache
            --> Clear storage (or CLEAR DATA)
5.2 The Android application cannot connect to the Broker
- An error dialog something like “Cannot connect to the Broker” is shown.
- Make sure the Android device is connected to the external network via cellular or Wi-Fi (= not in airplane mode).
- Make sure the
Brokeris up and running on the back-end side.
- Connection attempt to the
Brokertimeouts.- Check the IP address (or FQDN) and port number of the
Broker.- FQDN: Fully Qualified Domain Name
- Check the IP routing between the Android device and the
Broker. - There may exist firewall along the route. If so, check its settings.
- Check the IP address (or FQDN) and port number of the
5.3 An error dialog is shown while the Android application is running
- An error dialog something like “EOF exception” is shown.
- It means the network connection with the
Brokeris lost. - Check the connection status of the Android device.
- Check the status of the back-end container.
- It means the network connection with the
5.4 Graph cannot be displayed on the web interface
- Sensor type mismatch between the received data and the graph settings.
- Initial graph settings takes following 3 sensor types.
- light
- magnetic_field
- gravity
- If you want to see other sensor types, or if some of those types are unavailable on the Android device, choose desired ones via the settings dialog on the web interface.
- See the companion document TUTORIAL - A web interface for the sensor data visualization for more info.
- Initial graph settings takes following 3 sensor types.
- User specified the sensor type that require run-time permissions.
- User must explicitly give permissions to use some kind of sensor types.
- Currently,
step_counterandstep_detectorare applicable for this category. - Give permissions for
Physical activityas follows.Settings --> Apps & notifications --> Sensor --> Permissions --> Physical activity: ALLOWED
- User specified an invalid topic name.
- The back-end system behind the
Brokerextracts the received message with the fixed topic namesensor-data. - Make sure that topic name is
sensor-data, in theBrokercategory of the “Sensor” application settings.
- The back-end system behind the
- Sensor readout values are too old and out of plot range.
- While connecting to the URL of the web interface, graph display regions are updated in real time.
- Make sure that “Sensor” application on an Android device is currently publishing sensor readout values.
- Graph data is missing while Android device screen is off.
- To save battery consumption, all sensors are disabled while in display sleep mode.
- The situation is the same if “Sensor” application went into background of other application.
- Adjust the screen timeout in the Android system settings.