Quick Start Guide (Android)
Table of contents
1. Introduction
2. Operation environment
3. Prerequisites
3.1 Android client
3.2 Back-end system
3.3 Observatory PC (applicable only for the `STEP2` shown below)
4. Run tutorial scenarios
1. Introduction
The generalized form of system components, which is depicted in
the Quick Start Guide (Python/Java) looks like as follows.
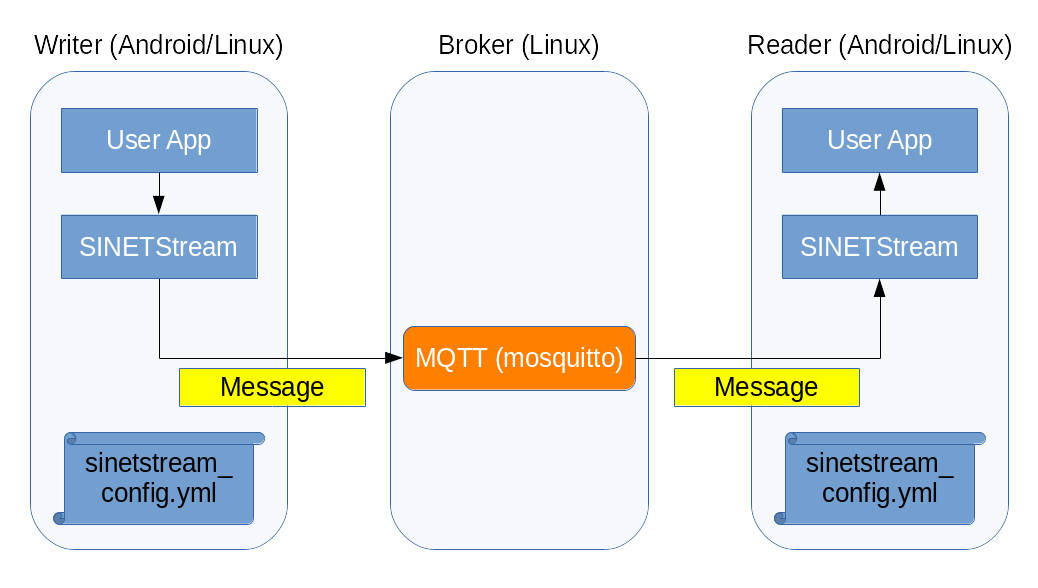
Note that Writer and Reader functionalities on client side
can be Android version, Linux version or the mix of them.
In this tutorial, we focus on cases in which Android application
works as both Writer and Reader, or either of them.
2. Operation environment
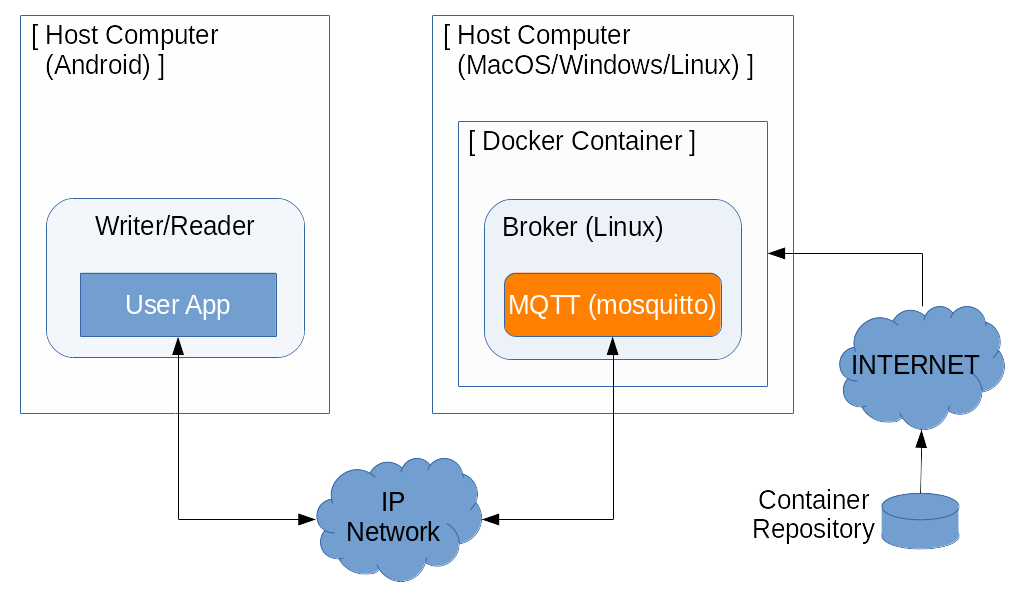
Just like the tutorials for Python/Java version, we setup Broker
functionality on a Docker container, which is a virtual running
environment for applications.
For this purpose, you will take following steps; 1) install the
Docker Engine on a host machine, 2) download and run the Docker
container prepared for this tutorial.
On the other hand, install our sample Android application on your
Android device so that it work as Writer or Reader.
Once you have set proper running parameters, the Android application
can co-operate with the Broker.
In short, there are several steps to build the operation environment for this tutorial. You need to prepare the back-end system, install the client application on your Android device, and set connection parameters for the two of them. Detailed work procedures will be shown on latter parts.
3. Prerequisites
Following conditions must be fulfilled to run this tutorial.
3.1 Android client
- The Android device must be IP reachable with the back-end system.
- Example#1) An Android device with SINET SIM connects to the
back-end system.
This is a connection model that the Android device connects to the
Brokervia cellular network. - Example#2) An Android device connects to the host running
the
Brokervia LAN.This is a connection model that the back-end system is built on your desktop PC.
- Example#1) An Android device with SINET SIM connects to the
back-end system.
3.2 Back-end system
- The host running
Brokermust be Internet reachable.- The host downloads the target container image from our container repository.
- A
Docker Enginemust have installed on the host which runsBroker.- The
Docker Engineis the platform for a container image. - As an example, we use a commercial cloud service
Amazon AWSas our platform. - We also show how to install
Docker Engineon a desktop PC, as an casual test environment.
- The
3.3 Observatory PC (applicable only for the STEP2 shown below)
- The observatory PC must be able to connect to the back-end system by HTTP.
- Beware routing and firewall settings for the connectivity.
- The observatory PC must be INTERNET reachable.
- Some of element parts displayed on the web screen will be fetched from open server.
4. Run tutorial scenarios
To show sample usages of SINETStream for Android, we provide two scenarios below.
- STEP1: Send and receive text messages (sinetstream-android-echo)
- Send a GUI input text to the peer
Broker, then receive it.
- Send a GUI input text to the peer
- STEP2: Publish sensor readout values (sinetstream-android-sensor-publisher)
- Send sensor readout values collected on the Android to the peer
Broker. - The back-end system behind the
Brokerstores the sensor readout values to the database. - A web browser on an observatory PC shows the graph image of sensor readout values.
- Send sensor readout values collected on the Android to the peer
Detailed procedures are shown in the links above. Both two of steps are independent, and thus you can try one of them only, or run each of them sequentially.
NOTE:
If you are going to run above two samples sequentially, try STEP2 first for smooth operations.
In STEP1, the
Brokercan be anything. But in STEP2, the dedicated container image must be used so that the back-end system to couple with theBrokerfor sequential processing. That is, if you run STEP2 first and leave the container image running, you can reuse theBrokeras is in STEP1.Of course, you can use the
Broker, which is in the tutorial container for the Python/Java version, as the back-end system of STEP1. In this case, beware not to forget to replace container image before running STEP2.