TUTORIAL - STEP1: Send and receive text messages
Table of contents
1. Introduction
2. System configuration
3. The flow of work
3.1 Works on the back-end side (part 1)
3.2 Works on the Android side
3.3 Works on the back-end side (part 2)
4. Restrictions
5. If something goes wrong
5.1 Want to reset the Android application settings
5.2 The Android application cannot connect to the Broker
5.3 An error dialog is shown while the Android application is running
1. Introduction
As the first step of a sample program which uses the Android SINETStream library, we demonstrate a simple system configuration.
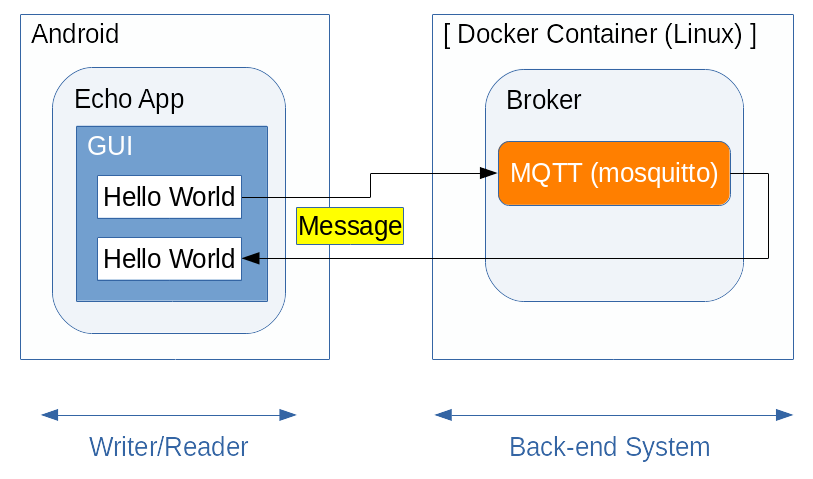
It is a kind of echo back system. An Android application sends a
message (such like “Hello World”) to the Broker,
then the Broker sends it back, and finally the Android application
receives it.
2. System configuration
In this scenario, we use an Android application “Echo”, which has
both Writer and Reader functionalities, and a Broker
functionality on the back-end side.
For better readability of this tutorial, we describe details per functional elements
- Works on the back-end side
- Works on the Android side
in the latter part of this document. Please proceed along with those descriptions.
Once you went through the running environment installations,
you need to fill-in the connection settings between the Android and
the Broker, before actually run the Android Application.
Please set parameters to fit with your network configurations.
3. The flow of work
3.1 Works on the back-end side (part 1)
The Android application for this tutorial contains both Writer
and Reader functionalities, and both of them use the identical
Broker connection parameter sets (Address, Port, Topic Name).
Therefore, no special handling for the Broker is needed.
It is enough only if the Android application can connect to the
peer Broker.
If there is an active Broker which has used for other tutorial,
you can use it as is.
Here we demonstrate a sample usage that only the MQTT Broker
functionality is used while other elements of the back-end system
for the other tutorial (TUTORIAL-ANDROID-STEP2) left untouched.
% sudo docker run -d --name broker -p 1883:1883 -p 80:80 harbor.vcloud.nii.ac.jp/sinetstream/android-tutorial:latest
The arguments of the
docker runcommand above specify the container name asbroker, and open two TCP ports: 1883 (MQTT) and 80 (HTTP). If you need to change the listening port numbers, adjust the-poption values accordingly.
With this docker run command, installation of the back-end system
and starting of server processes are automatically executed.
3.2 Works on the Android side
We describe procedures such like installation, settings and operations of the Android application “Echo”.
Please see the companion document TUTORIAL - Android:STEP1 for details.
3.3 Works on the back-end side (part 2)
Once you have done this tutorial, computational resources for it must be freed. Please stop and remove the container image with the following commands.
If the Android application is still running, you will see an error dialog “EOF exception”, because the connection is closed by
Brokershutdown.
     % sudo docker stop broker
     % sudo docker rm broker
Please see the companion document TUTORIAL-DOCKER-CONTAINER for details.
4. Restrictions
Because of the nature of tutorial which aims to experience
the system behavior, this tutorial does not fully cover the
Android SINETStream library functionalities.
If you use the Broker shown in this tutorial, beware that
there are some functional restrictions as follows.
- Connection method with
Broker-
The Android application connects to the
Brokerwith the simplest way; no user authorization, no SSL/TLS, no encryption. -
For the sake of simple processing, the
Brokerdoes not distinguish each Android clients. Actually, multiple Android clients can connect to the sameBrokerat the same time. In that case, a message sent by aWriterwill be re-distributed to allReaders.
-
5. If something goes wrong
5.1 Want to reset the Android application settings
- Reset everything to restart from scratch.
- Exercise the following steps to clear local data of the application.
- There are two kind of areas,
Storage(orDATAin older Android versions) andCache. - We need to clear
Storagearea for reset operation.
    Settings
    --> Apps & notifications
      --> App info
        --> Echo
          [FORCE STOP]
          --> Storage & cache
            --> Clear storage (or CLEAR DATA)
5.2 The Android application cannot connect to the Broker
- An error dialog something like “Cannot connect to the Broker” is shown.
- Make sure the Android device is connected to the external network via cellular or Wi-Fi (= not in airplane mode).
- Make sure the
Brokeris up and running on the back-end side.
- Connection attempt to the
Brokertimeouts.- Check the IP address (or FQDN) and port number of the
Broker.- FQDN: Fully Qualified Domain Name
- Check the IP routing between the Android device and the
Broker. - There may exist firewall along the route. If so, check its settings.
- Check the IP address (or FQDN) and port number of the
5.3 An error dialog is shown while the Android application is running
- An error dialog something like “EOF exception” is shown.
- It means the network connection with the
Brokeris lost. - Check the connection status of the Android device.
- Check the status of the back-end container.
- It means the network connection with the