TUTORIAL - ANDROID-STEP1
Table of contents
1. Introduction
1.1 Network model
1.2 Prerequisites
2. Installation of the "Echo" application
3. Operation of the "Echo" application
3.1 Screen transitions
3.2 Initial screen
3.3 Settings screen
3.4 Main screen

Appendix
A.1 Source code
A.2 Known problems
1. Introduction
We implemented an Android application “Echo”, as a sample usage of the Android SINETStream library. The application sends and receives text messages over the SINETStream. In this document, we briefly describe how to install this application to an Android device, how to setup and operate it.
1.1 Network model
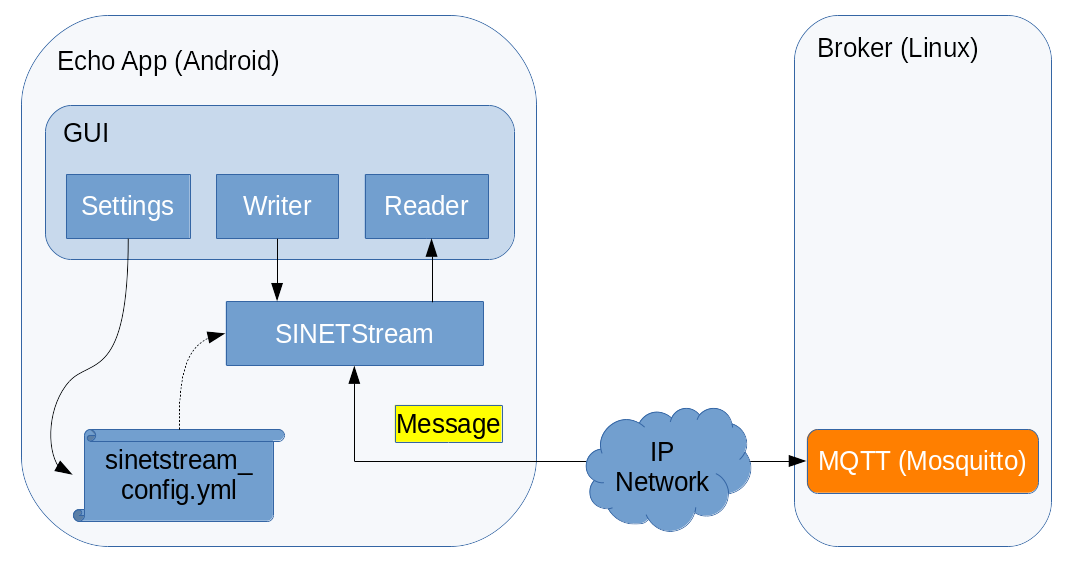
The “Echo” application has both Writer and Reader functionalities.
Once user inputs a text via GUI operations, the text will be sent to
the peer Broker as a SINETStream message.
The Broker redistributes the message, then the “Echo” application
receives it and shows its contents on the GUI.
The “Echo” application has its own “Settings” screen, and thus user
can set configuration parameters such like the Broker connection
or the SINETStream behaviors.
Once user has set those parameters, the Android
SINETStream configuration file
will be automatically generated.
As for the Broker details, it is not mentioned here.
Please refer to the companion document.
1.2 Prerequisites
-
The Android device
- Android 8.0 (API level 26) or later
- The Android SINETStream library uses the MQTT(Eclipse Mosquitto) as a messaging system.
- The implementation of the
Paho MQTT Android Client
requires
Android 8.0+as its running condition.
- Android 8.0 (API level 26) or later
-
Preparations for the back-end system
- Within the scope of this tutorial, we just need a peer
Brokerwhich communicates with an Android device. - On the host machine for the back-end system, run
docker runcommand which installs the container image for this tutorial. Server processes will be automatically started afterward. - The back-end system should be up and running before working on the Android device.
- Back to the previous document and see the section 3.1 Works on the back-end side (part 1) for details.
- Within the scope of this tutorial, we just need a peer
-
Network environment
- The Android device and the peer
Brokeris connected via IP (Internet Protocol) network. Make sure the end-end IP reachability via cellular or Wi-Fi network.
- The Android device and the peer
2. Installation of the “Echo” application
Currently, the “Echo” application will be available from the NII managed server, not from Google Play.
Please see the companion document Installation of the sample Android application for details. The procedure is the same for updating the older version.
3. Operation of the “Echo” application
3.1 Screen transitions
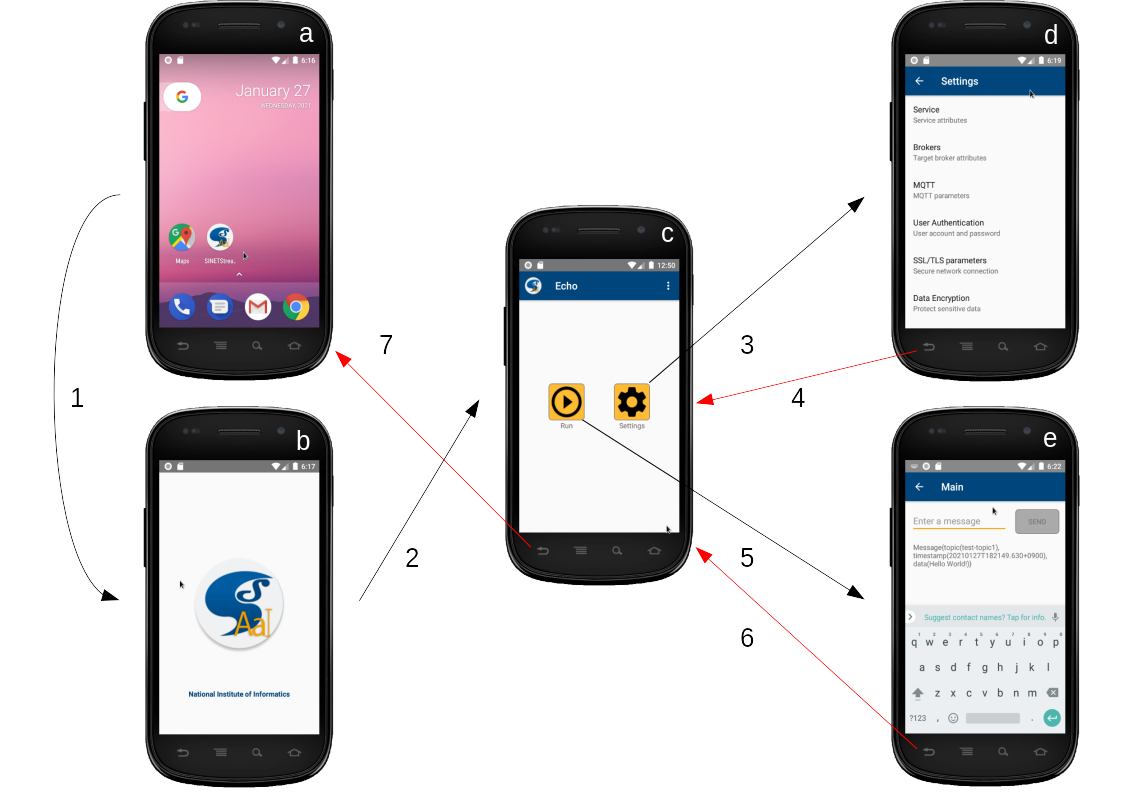
<Legend>
- On the Android home (a), press the icon
Echoto start. - On the splash screen (b), application icon and the copyright holder will be briefly shown. Then the screen transits to the initial one (c).
- Pressing the button
Settingscauses the initial screen (c) transit to the settings screen (d). - Pressing the button
BACKcauses the settings screen (d) transit to the initial screen (c). - Pressing the button
Runcauses the initial screen (c) transit to the main screen (e). - Pressing the button
BACKcauses the main screen (e) transit to the initial screen (c). - Pressing the button
BACKcauses the initial screen (c) transit to the Android home (a).
In the latter part of this document, each screen layout and operation details will be addressed.
3.2 Initial screen
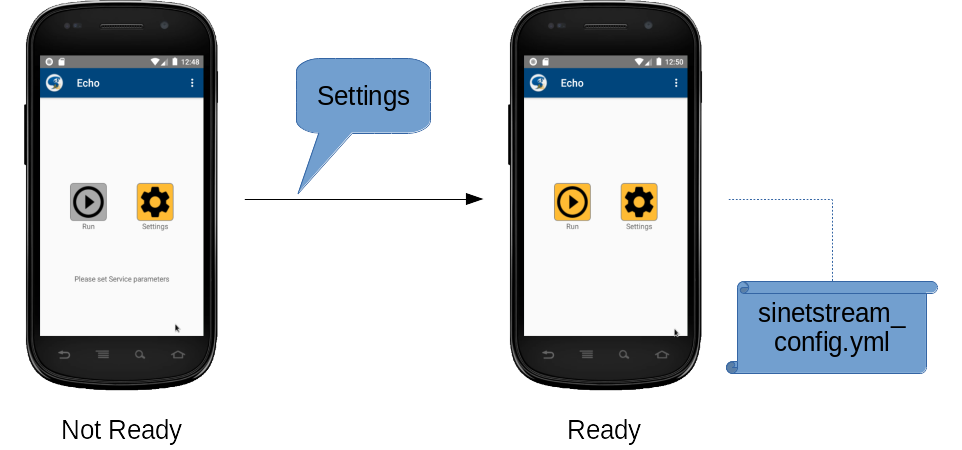
This is the initial screen after application startup.
Runbutton- Start the
MainActivity of this application. - Once the main screen finishes, control comes back to this screen.
- Start the
Settingsbutton- Start the
SettingsActivity for this application. - Once the settings screen finishes, control comes back to this screen.
- Start the
- Menu button
- By pressing the “vertical 3-dots” on the top right corner,
a small menu will be deployed.
Help: Show help for this application.About: Show brief information about this application.
- By pressing the “vertical 3-dots” on the top right corner,
a small menu will be deployed.
If the
SINETStream configuration file
does not yet exist (just like after the fresh installation),
or if current configuration does not meet the mandatory conditions,
Run button is set disabled (gray out) and a guide message will be
shown to let user take actions.
In these cases, press the Settings button and fill-in the mandatory
SINETStream parameters.
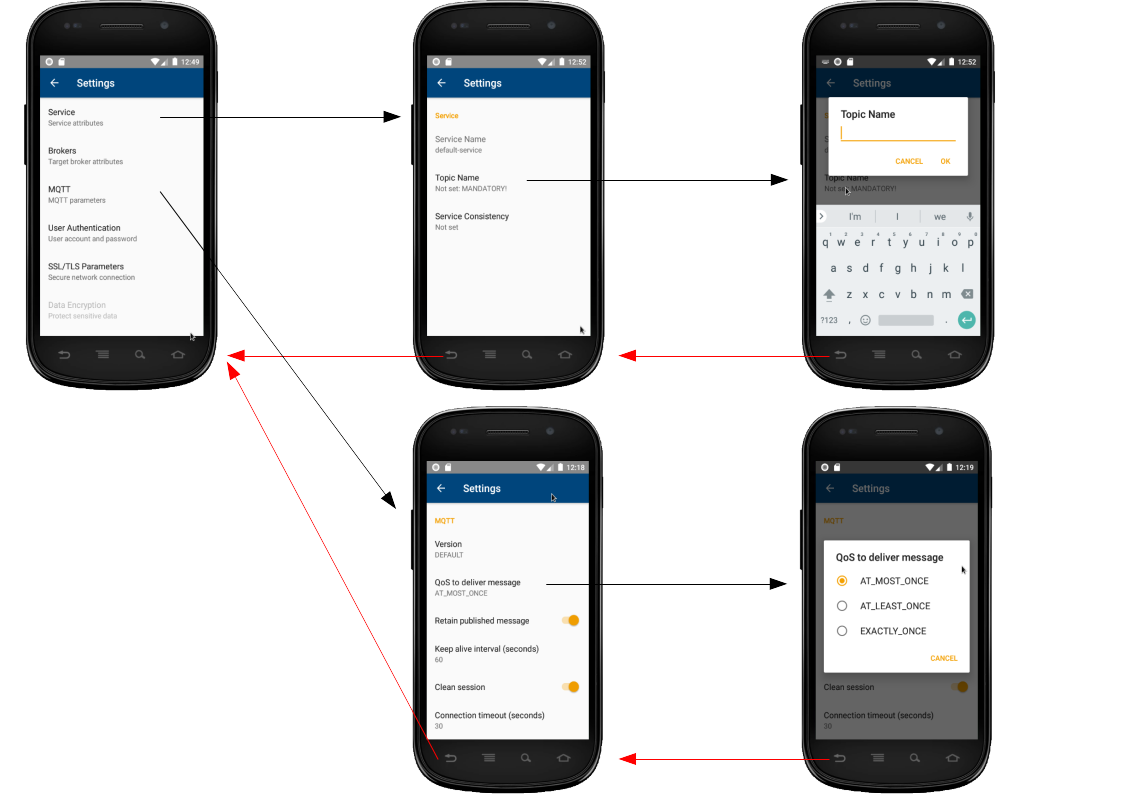
3.3 Settings screen
To use the Android
SINETStream library,
its own
SINETStream configuration file
must be set properly, so that the user application using the library
can connect to the peer Broker.
We provide a GUI-based settings screen for this purpose. As shown below, the settings screen consists of layered structure representing each item categories.
On the initial screen, press the Settings button to transit to
the settings screen. Before coming back to the initial screen after
several settings operations, the SINETStream configuration file
will be automatically generated.
If there are some configration changes from the previous settings,
the file contents will be updated.
Following items must be set to connect to the Broker.
Other items can be left untouched. If so, program default values
will be used.
- Service Name:
Service -> Service Name - Topic Name:
Service -> Topic Name Brokerconnection information (Address, Port)Brokers -> IP Address (or FQDN)Brokers -> Port Number
In the case of the Broker shown in this tutorial, above mandatory
parameters would look like as follows. Note that actual Broker
address must be set according to the running environment.
| Service Name | Topic Name | IP Address (or FQDN) | Port Number |
|---|---|---|---|
| test-service | test-topic | xx.xx.xx.xx | 1883 |
Note that the
Topic Nameis a string used as a communication channel identifier. User can set any value for it, but in the STEP1 context, beware to avoid the reserved wordsensor-datawhich conflicts with the back-end system usage.
3.4 Main screen
On the initial screen, press the Run button to transit to the
main screen which sends or receives the user-input text data.
The main screen is vertically split into two panes; the upper
pane provides the Writer functionality, while the lower pane
provides the Reader functionality.
Both the Writer and the Reader refer to the same
SINETStream configuration file.
Therefore, the both two share the same service and topic for the
peer Broker. This means that a message sent by the Writer is
echoed back to the Reader.
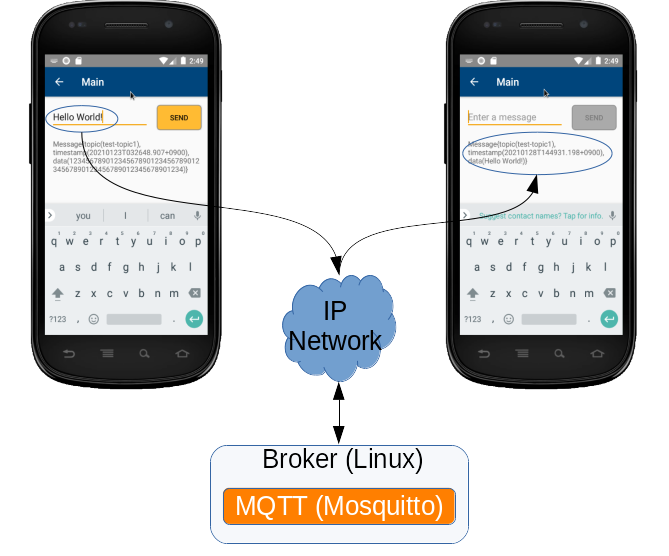
The Main screen roughly works as follows.
- When the main screen is started from the initial screen, both the
Writerand theReaderindependently start connecting to the peerBroker. - Once both
WriterandReaderhas connected to theBroker, the text input area in the upper pane is set enabled. - Once user inputs any text, the
SENDbutton is set enabled. - If user presses the
SENDbutton, the input text will be sent to theBroker. - The contents received from the
Brokerwill be shown in the lower pane. - Before the main screen goes back to the initial screen, both the
Writerand theReaderclose the connections with theBroker.
Note that the user input text in the upper pane is sent to the
Broker as the payload of a SINETStream message v1.2 format.
On the lower pane, elements in the SINETStream message (timestamp,
data) and the topic name are combined and shown as a Message.
- Message
- topic: Topic name
- timestamp: ISO8601 style date-time expression
- data: User input text data
Appendix
A.1 Source code
The source code of this application is open and available from GitHub. If you found something wrong, please contact us.
If you need to modify the source code, install the Android development environment Android Studio to your working machine, and load the source code.
A.2 Known problems
-
Implementation status of information security
Functionality Item Status User Authentication DONE SSL/TLS communication DONE Data encryption/decription Work in progress -
The mapping of the GUI
Settingsand the SINETStream configuration file- The GUI
Settingsdoes not fully cover the items described in SINETStream configuration file.
- The GUI