Tutorial - STEP1
1. Overview
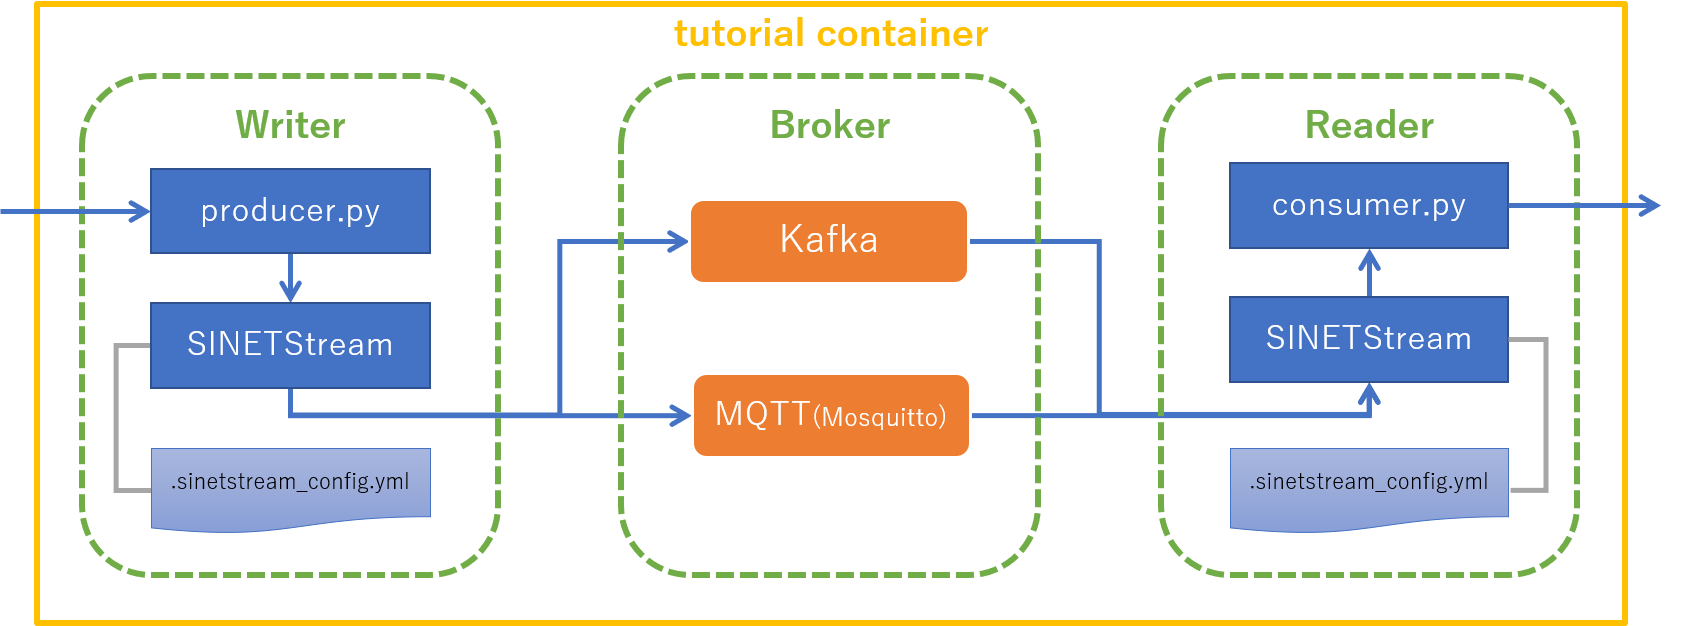
The components used in this tutorial are shown in the figure below.
The role of those components shown in Quick Start Guide are as follows.
Writersends messages toBrokerviaSINETStreamReaderreceives messages fromBrokerviaSINETStreamBrokeraggregates and delivers messages fromWritertoReader, and separates the endpoints from each other.
Writer, Reader, and Broker work on a single machine in the STEP1 of the tutorial.
Specifically, one container is started in the execution environment of the tutorial, and all the components of the tutorial are executed in that container.
Prerequisite
Docker Engine must be installed on the machine where you run the tutorial. You can find information about installing Docker Engine in Links to Docker Engine installation instructions.
Notational conventions
There will be several instructions with command execution examples. Since this tutorial uses Docker containers, it is necessary to distinguish between the host environment and the container environment. We use the following conventions for this purpose.
- When executing commands in the host environment
- The command prompt is
$.$ ls
- The command prompt is
- When executing commands in the container environment
- The command prompt is
[user01 @ broker]$.[user01 @ broker]$ lsThe prefix
[user01@broker]in the prompt of the container environment indicates that the container hostname isbrokerand the username isuser01.
- The command prompt is
2. Prepare the execution environment
2.1. Prepare the backend system
Run the backend messaging system (Kafka and MQTT) used by SINETStream in a Docker container.
Execute the following command in the host environment.
$ docker run -d --name tutorial --hostname broker harbor.vcloud.nii.ac.jp/sinetstream/tutorial:1.8
Show the status to confirm that the container has started successfully.
$ docker ps -l
CONTAINER ID        IMAGE                        COMMAND                  CREATED              STATUS              PORTS                NAMES
xxxxxxxxxxxx        sinetstream/tutorial:1.8   "/usr/local/bin/supe…"   About a minute ago   Up About a minute   1883/tcp, 9092/tcp   tutorial
If the STATUS is shown as Up, the container has started successfully.
In the started container, the broker of the messaging system, i.e., Kafka and MQTT (Mosquitto), is running.
2.2. Install SINETStream
Install the Python3 library of SINETStream used by Reader and Writer on the container environment.
First, log in to the container environment from the host environment. Please execute the following command.
$ docker exec -it -u user01 tutorial bash
Next, install the library of SINETStream on the container environment. Please execute the following command.
[user01@broker]$ pip3 install --user sinetstream-kafka sinetstream-mqtt
Collecting sinetstream-kafka
(omit)
Successfully installed avro-python3-1.10.0 kafka-python-2.0.2 paho-mqtt-1.5.1 promise-2.3 pycryptodome-3.9.9 pyyaml-3.13 sinetstream-1.4.0 sinetstream-kafka-1.4.0 sinetstream-mqtt-1.4.0 six-1.15.0
Finally, if the message Successfully installed ... is shown, the library has been successfully installed.
To show the list of installed Python 3 libraries, use the following command.
[user01@broker]$ pip3 list
Package           Version
----------------- --------
avro-python3      1.10.0
kafka-python      2.0.2
paho-mqtt         1.5.1
pip               20.2.4
promise           2.3
pycryptodome      3.9.9
PyYAML            3.13
setuptools        50.3.2
sinetstream       1.4.0
sinetstream-kafka 1.4.0
sinetstream-mqtt  1.4.0
six               1.15.0
supervisor        4.2.1
The
Versions of other libraries than SINETStream may differ from the above example.
2.3.Prepare Reader
Prepare Reader in the container environment.
Below is the procedure.
- Create a directory for
Reader - Prepare the SINETStream configuration file
- Prepare the
Readerprogram
In this section, the command is executed in the container environment. We use the same container environment as in section
2.2.
Create a directory and change to that directory.
[user01@broker]$ mkdir -p ~/sinetstream/reader
[user01@broker]$ cd ~/sinetstream/reader
Prepare the SINETStream configuration file. Download the configuration file prepared for this tutorial from GitHub.
[user01@broker]$ ss_url=https://raw.githubusercontent.com/nii-gakunin-cloud/sinetstream/main
[user01@broker]$ curl -O ${ss_url}/docs/tutorial/.sinetstream_config.yml
Download the sample program of Reader that uses the SINETStream Python3 API from GitHub. Grant execute permission to the program.
[user01@broker]$ curl -O ${ss_url}/python/sample/text/consumer.py
[user01@broker]$ chmod a+x consumer.py
Verify that the above procedure has been performed correctly. Make sure that the directories and files are the same as in the example below.
[user01@broker]$ pwd
/home/user01/sinetstream/reader
[user01@broker]$ ls -a
.  ..  .sinetstream_config.yml  consumer.py
2.4. Prepare Writer
Prepare Writer in the container environment.
Below is the procedure.
- Create a directory for
Writer - Prepare the SINETStream configuration file
- Prepare the
Writerprogram
Create a directory and change to that directory.
[user01@broker]$ mkdir -p ~/sinetstream/writer
[user01@broker]$ cd ~/sinetstream/writer
Download the configuration file from GitHub.
[user01@broker]$ ss_url=https://raw.githubusercontent.com/nii-gakunin-cloud/sinetstream/main
[user01@broker]$ curl -O ${ss_url}/docs/tutorial/.sinetstream_config.yml
Download the sample program of Writer that uses the SINETStream Python3 API from GitHub.
Grant execute permission to the program
[user01@broker]$ curl -O ${ss_url}/python/sample/text/producer.py
[user01@broker]$ chmod a+x producer.py
Verify that the above procedure has been performed correctly. Make sure that the directories and files are the same as in the example below.
[user01@broker]$ pwd
/home/user01/sinetstream/writer
[user01@broker]$ ls -a
.  ..  .sinetstream_config.yml  producer.py
3. Run Reader and Writer
Run Reader and Writer to confirm that messages can be sent and received via SINETStream.
SINETStream supports Kafka and MQTT(Mosquitto) as backend messaging systems. First, make sure that you can send and receive messages to/from the Kafka broker. After that, confirm that you can send and receive messages to/from the MQTT broker by changing the settings (without changing the program).
3.1. Send and receive messages to/from Kafka brokers
Thereafter, you will execute the Reader and Writer programs at the same time.
Open two terminals in the host environment to run them.
Run Reader
In the terminal for Reader, log in to the container environment from the host environment.
Please execute the following command.
$ docker exec -it -u user01 tutorial bash
Change to the directory for Reader.
[user01@broker]$ cd ~/sinetstream/reader
Run the Reader program.
In the argument, the service name of the Kafka broker service-tutorial-kafka is specified.
[user01@broker]$ ./consumer.py -s service-tutorial-kafka
Press ctrl-c to exit the program.
: service=service-tutorial-kafka
The service name specified in the command line is shown after the colon(:).
Run Writer
In the terminal for Writer, log in to the container environment from the host environment.
Please execute the following command.
$ docker exec -it -u user01 tutorial bash
Change to the directory for Writer.
[user01@broker]$ cd ~/sinetstream/writer
Run the Writer program.
In the argument, the service name of the Kafka broker service-tutorial-kafka is specified.
[user01@broker]$ ./producer.py -s service-tutorial-kafka
Press ctrl-c to exit the program.
: service=service-tutorial-kafka
The service name specified in the command line is shown after the colon(:).
Send and receive messages
In the terminal for Writer, enter some text and hit the Enter (Return) key.
The text will be sent as a message to the Kafka broker.
The Reader program receives the message from the Kafka broker and shows it in the terminal.
Check that the message you sent from Writer is shown in the terminal for Reader.
Stop Reader and Writer
Once the messages has been transmitted, stop the sample programs of Reader and Writer.
Please type ctrl-c at each terminal.
3.2 Send and receive messages to/from MQTT broker (Mosquitto)
You can confirm that messages can be sent and received via the MQTT broker in the same manner as for the Kafka broker.
In the argument, specify the service name of the MQTT broker service-tutorial-mqtt in place of service-tutorial-kafka in the above example.
Run Reader
Execute the following command in the terminal for Reader.
[user01@broker]$ ./consumer.py -s service-tutorial-mqtt
Press ctrl-c to exit the program.
: service=service-tutorial-mqtt
The current directory of the terminal for
Readeris assumed to be theReader’s directory in the container environment.
Run Writer
Execute the following command in the terminal for Writer.
[user01@broker]$ ./producer.py -s service-tutorial-mqtt
Press ctrl-c to exit the program.
: service=service-tutorial-mqtt
The current directory of the terminal for
Writeris assumed to be theWriter’s directory in the container environment.
Send and receive messages
Perform the same operations as for the Kafka broker.
In the Writer’s terminal enter some text and hit the Enter (Return) key.
Check that the text is shown in the Reader’s terminal.
Stop Reader and Writer
Once the messages have been transmitted, stop the sample programs of Reader and Writer.
Please type ctrl-c at each terminal.
3.3. Stop and delete containers
Finally, stop and delete the container used in this tutorial.
Operations on containers should be performed on the host environment.
To log out from the container environment, execute exit within the container.
[user01@broker]$ exit
exit
$
After returning to the host environment, please execute the following command.
$ docker stop tutorial
$ docker rm tutorial
4. About SINETStream
Here is a brief description of the SINETStream configuration file and the API used in this tutorial.
4.1. Configuration file
The contents of the SINETStream configuration file .sinetstream_config.yml is as follows.
header:
    version: 3
config:
    service-tutorial-kafka:
        type: kafka
        brokers: "broker:9092"
        topic: topic-tutorial-kafka
        value_type: text

    service-tutorial-mqtt:
        type: mqtt
        brokers: "broker:1883"
        topic: topic-tutorial-mqtt
        value_type: text
The configuration file contains hierarchical keys and values in YAML format.
The top level key is the service name defined in SINETStream.
In the above example, service-tutorial-kafka and service-tutorial-mqtt are the service name.
The service name is a label to collectively handle various parameters related to the broker.
The service name specified in the arguments of the Reader and Writer sample programs corresponds to this label defined in the configuration file.
Specify the parameters related to the broker in the child elements of the service name.
The parameters corresponding to the service name service-tutorial-kafka are as follows.
    type: kafka
    brokers: "broker:9092"
    topic: topic-tutorial-kafka
    value_type: text
Below is a brief description of each parameter.
- type
- Specify the type of the messaging system.
- Use
kafka,mqtt, etc.
- brokers
- Specify the address(es) of the broker(s).
- The format of the address is the host name and port number concatenated by a colon(
:).
- topic
- Specify the topic name to/from which the messages are sent and received.
- value_type
- Specify the message type.
- One of the following values can be used.
textbyte_array
- The
texttype used in the tutorial specifies that the message is of type string
Please refer to the user guide for more information about configuration files.
4.2. SINETStream API
Reader
In the Reader sample program consumer.py, the SINETStream API is used as follows.
with MessageReader(service) as reader:
    for message in reader:
        print(f"topic={message.topic} value='{message.value}'")
The entire code of the sample program consumer.py is available on GitHub.
First, create a MessageReader object to receive a message, specifying the service name in the argument.
MessageReader is usually executed by Python’s with statement.
As a result, connection and disconnection to/from the broker are executed at the boundary of the with block.
The object named reader given by the with statement is iterable.
The object named message given by the for statement is the message received from the broker.
Writer
In the Writer sample program producer.py, the SINETStream API is used as follows.
with MessageWriter(service) as writer:
    while True:
        message = get_message()
        writer.publish(message)
The entire code of the sample program producer.py is available on GitHub.
First, create a MessageWriter object to send a message, specifying the service name in the argument.
MessageWriter is usually executed by Python’s with statement.
As a result, connection and disconnection to/from the broker are executed at the boundary of the with block.
Send a message to the broker by invoking the publish(message) method of the object named writer given by the with statement.
Please refer to the user guide for more information about SINETStream Python API.
4.3 SINETStream API (asynchronous API)
SINETStream v1.4 now supports asynchronous API. We have prepared sample programs on Github that executes the same processing as described above with asynchronous API.
Reader (asynchronous API)
In the sample program consumer.py of the ‘Reader’ of the asynchronous API, We use the following example to show how to use SINETStream API.
reader = AsyncMessageReader(service)
reader.on_message = show_message
reader.open()
First, let’s create an ‘AsyncMessageReader’ object to receive the message. At that time, please specify the service name as an argument.
Next, specify the callback function to be called when a message is received in the ‘.on_message’ property. The callback function can receive the messages from the argument. The sample program uses the following callback function.
def show_message(message):
    ts = datetime.fromtimestamp(message.timestamp)
    print(f"[{ts}] topic={message.topic} value='{message.value}'")
Finally, you call reader ’.open()’ to connect to the broker.
Writer (asynchronous API)
In the sample program producer.py of the ‘Writer’ of the asynchronous API, we use the following example to show how to use SINETStream API.
with AsyncMessageWriter(service) as writer:
    while True:
        message = get_message()
        writer.publish(message)
First, create an ‘AsyncMessageWriter’ object for sending messages. At that time, specify the service name as an argument. ‘AsyncMessageWriter’ is usually executed by with statement of Python. This will connect to and disconnect from the broker within the block of the with statement. You can send a message to the broker by calling ‘.publish(message)’ on the value ‘writer’ which returned by the with statement.
In synchronous API, ‘.publish()’ blocks the sending process until it completed, but in asynchronous API, it returns without blocking the process. In addition, ‘.publish()’ of asynchronous API returns a Promise Object to specify the processing after the processing result is confirmed.