TUTORIAL - Installation of certificates in the system credential storage
Table of contents
1. Introduction
2. Who should read this?
3. Preparations
3.1 Prepare SSL/TLS certificate files
3.1.1 Self-signed server certificate
3.1.2 Client certificate
3.2 Prepare a file management application
3.3 Set screen lock
4. Obtain SSL/TLS certificate files
4.1 Obtain via network
4.2 Obtain via offline works
5. Install SSL/TLS certificate files
5.1 Guide to the certificate installation screen
5.2 Install a self-signed server certificate
5.3 Install a client certificate
5.4 Check the installed self-signed server certificate
5.5 Check the installed client certificate
1. Introduction
When an Android device connects to the peer broker using SSL/TLS, the broker requests to present a client certificate and/or a self-signed server certificate to the Android device, depending on the broker setting. That is, you need to pre-install the required SSL/TLS certificates on the Android device.
There are two options how an Android application access to the SSL/TLS certificates.
* a) When you implement an Android application, embed the SSL/TLS certificate files as the asset of the program.
* b) Pre-install the required certificates in the system credential storage, and refer them on application runtime.
On the latter case b), you do not have to embed any sensitive
information such like SSL/TLS certificates in a program.
* Even if the Android device has lost or stolen, sensitive information will not be leaked to the third party.
* Upon the expiration of SSL/TLS certificates, you can update them without modifying the program.
That is, you can reduce security threats because of above points.
In this document, we focus on the case b) and present concrete
procedures about how to install the SSL/TLS certificates in the
Android system credential storage (KeyChain) [1].
The screen shots on this document are taken on a Google Pixel 4 (Android 11) device. There may be some differences of screen appearances or descriptive expressions depending on the OS version. Please read accordingly, based on the running environment of your Android device.
2. Who should read this document?
If an Android device going to connect to a broker using SSL/TLS, required certificates must have prepared on the Android device. It depends the security policy on the broker side that determines what kind of certificates are required on the Android side.
- Is the broker that an Android device going to connect trustworthy?
- Use a server certificate signed by a commercial certificate authority (CA)[2], such like VeriSign –> Nothing to do on the Android side.
- Use a server certificate signed by the broker itself –> The Android device must install the self-signed server certificate.
- Is the Android device that going to connect to the broker trustworthy?
- The broker DOES trust the connecting Android device –> Nothing to do on the Android side.
- The broker challenges the connecting Android device –> The Android device must install the designated client certificate.
To summarize, if your Android device connects to the broker which
uses a server certificate signed by a commercial CA, and does not
require any client certificate
, then you can finish here.
Otherwise, install appropriate SSL/TLS certificates on your Android
device referring the following descriptions.
3. Preparations
3.1 Prepare SSL/TLS certificate files
Ask management staff to issue SSL/TLS certificate files to be installed on your Android device.
3.1.1 Self-signed server certificate
- Prepare a X.509 certificate file in PEM format (file extension
.crtor.cer) [3]. - We use a certificate file
vm00_cacert.crtas an example.
PC% file ./vm00_cacert.crt
./vm00_cacert.crt: PEM certificate

PC% openssl verify vm00_cacert.crt
vm00_cacert.crt: C = JP, ST = Example_State, O = Example_Organization, CN = private-ca
error 18 at 0 depth lookup:self signed certificate
OK
[3] X.509
3.1.2 Client certificate
- Prepare a PFX (Personal Information Exchange) file in PKCS#12 format
(file extension
.pfx) [4], and its corresponding password. - We use a certificate file
client03.pfxand its password as an example.
PC% file ./client03*
./client03.pfx: data
./client03.txt: ASCII text

PC% openssl pkcs12 -in client03.pfx -info -noout
Enter Import Password:
MAC Iteration 2048
MAC verified OK
PKCS7 Encrypted data: pbeWithSHA1And40BitRC2-CBC, Iteration 2048
Certificate bag
PKCS7 Data
Shrouded Keybag: pbeWithSHA1And3-KeyTripleDES-CBC, Iteration 2048
[4] PKCS#12
3.2 Prepare a file management application
- You can use any application which can handle the SSL/TLS certificate files.
- Your Android device may already have a file management application, something like a “File Manager”.
- In this document, we suppose to use the Google application Files by Google and describe operations accordingly.
3.3 Set screen lock
This section is optional for Android 10 or later devices. [5]
If you install a user specified secret file in the system credential
storage (KeyChain), you are required to set screen lock.
With the fact that you can unlock screen, you passed the device
authentication as the legitimate owner.
Though you can proceed without setting screen lock, you will be
prompted to do so at the time of SSL/TLS certificate installation.
    Home
    --> Settings
      --> Security
        --> Screen lock
          --> Choose a screen lock method (except "None" and "Swipe")
[5] KeyChain behavior changes and improvements
4. Obtain SSL/TLS certificate files
4.1 Obtain via network
-
File server
- Access to the file server by the
Chromebrowser and download the target SSL/TLS certificate files to your Android device. - Downloaded files will be located under the
Downloadsdirectory. - Upon completion, you will be asked whether to install the certificate file immediately. But please do nothing here.
- Access to the file server by the
-
Google Drive
- Put the target SSL/TLS certificate files somewhere on Google Drive with your Gmail account.
4.2 Obtain via offline works
-
SD card
This method is handy if your Android device has a SD card slot.
    1) Turn off power of your Android device.
    2) Remove the SD card from the chassis.
    3) Insert the SD card to your working PC and mount to the file system.
    4) Copy the target SSL/TLS certificate files to the SD card.
       Destination path can be anywhere, but root directory is handy.
    5) Unmount from the file system and eject the SD card.
    6) Insert the SD card to your Android device.
    7) Turn on power of your Android device.
-
Transfer SSL/TLS certificate files via USB cable
This method is targeted for developers.
- Connect the target Android device to your workstation by a USB cable.
Beware
screen lockis cleared beforehand. - If the target Android device is
USB debuggingenabled, theAndroid Debug Bridge (adb)[6] challenges for the device authentication. - Answer
OKto the confirmation dialog on the target Android device, so that the Android device is recognized by theadb. - Execute following commands on your workstation.
- Destination path is slightly different before and after Android 11.
- Connect the target Android device to your workstation by a USB cable.
Beware
# Android 10 or earlier
% adb push client03.pfx /mnt/sdcard
% adb push vm00_cacert.crt /mnt/sdcard
# Android 11
% adb push client03.pfx /mnt/sdcard
adb: error: stat failed when trying to push to /mnt/sdcard: Permission denied

% adb push client03.pfx /sdcard
% adb push vm00_cacert.crt /sdcard
[6] Android Debug Bridge (adb)
5. Install SSL/TLS certificate files
5.1 Guide to the certificate installation screen
To manipulate certificates managed by the system credential storage
(KeyChain), you need to dig into the deep layer of system settings.
At first, move to the base location as follows.
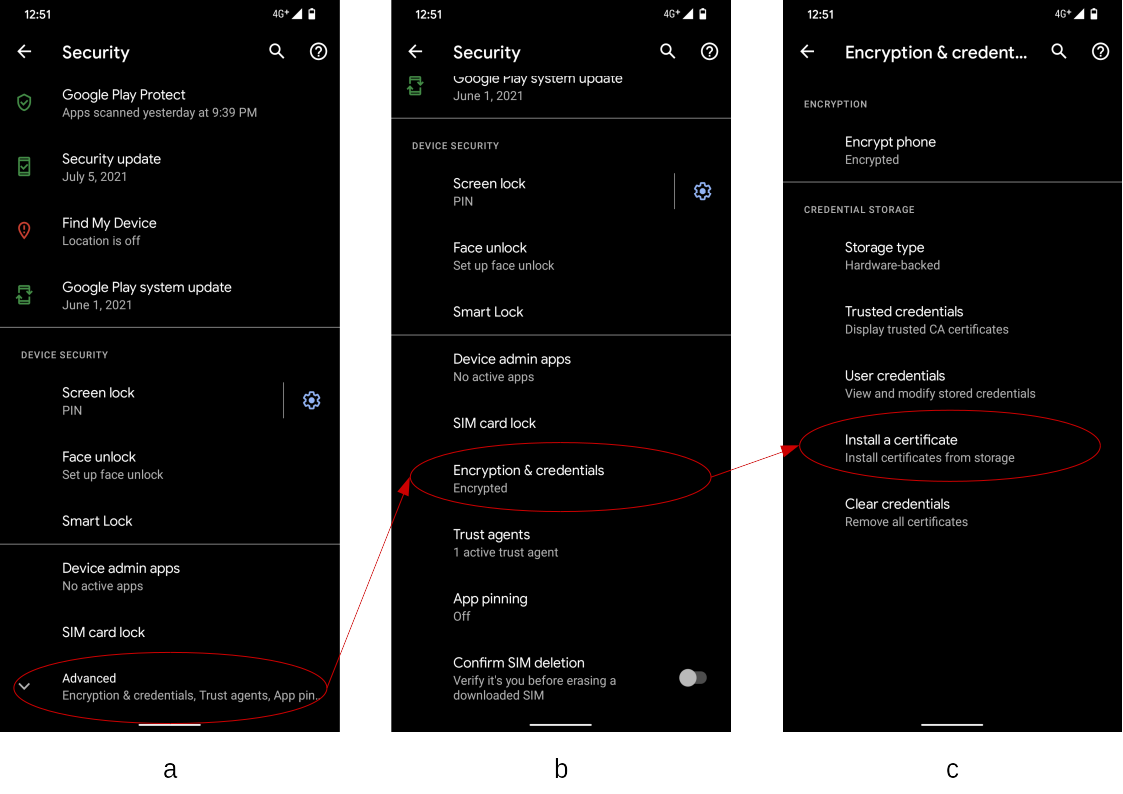
- Open the
Settingsapplication on your Android device, and move to theSecuritysetting screen (a). - As the initial state,
Encryption & credentialsettings are collapsed under the itemAdvanced. If you expand it, the screen looks like (b). - On the screen (b), select the item
Encryption & credentialand move to the screen (c). - On the screen (c), select the item
Install a certificateand move to the certificate installation screen, to be noted afterword.
5.2 Install a self-signed server certificate
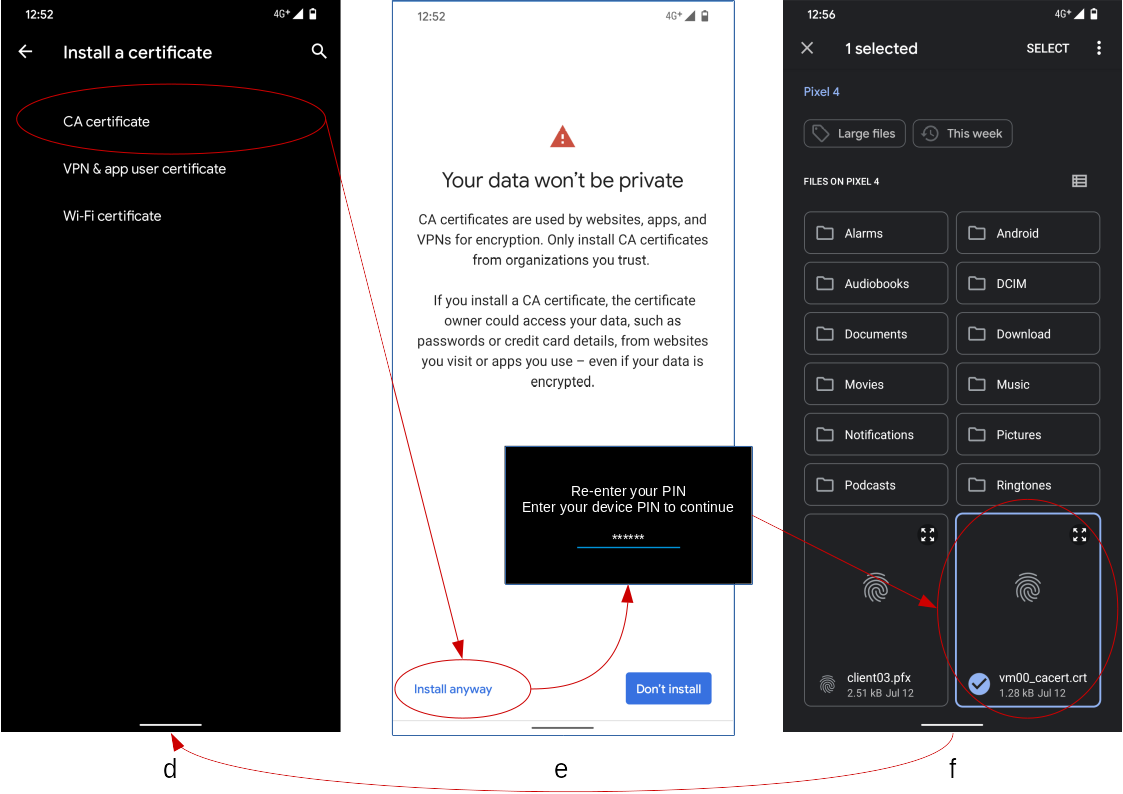
- If you select the item
CA certificateon the screen (d), a warning dialog about your data privacy (e) will be shown. - If you press the button
Install anyway, you will be challenged to clear the device authentication like screen unlock. - Once the device authentication has passed, you will be redirected to the file selection screen (f).
- Select the target certificate file (with a fingerprint icon).
- In this example, select the file
vm00_cacert.crtlocated immediate under the root file system. - If you put the target certificate file on a different file system such like SD card or Google Drive, press the burger-icon on the top left corner of the screen (f).
- In this example, select the file
- If the installation finished successfully, a toast message will be briefly shown, and you will be redirected to the initial screen (d).
5.3 Install a client certificate
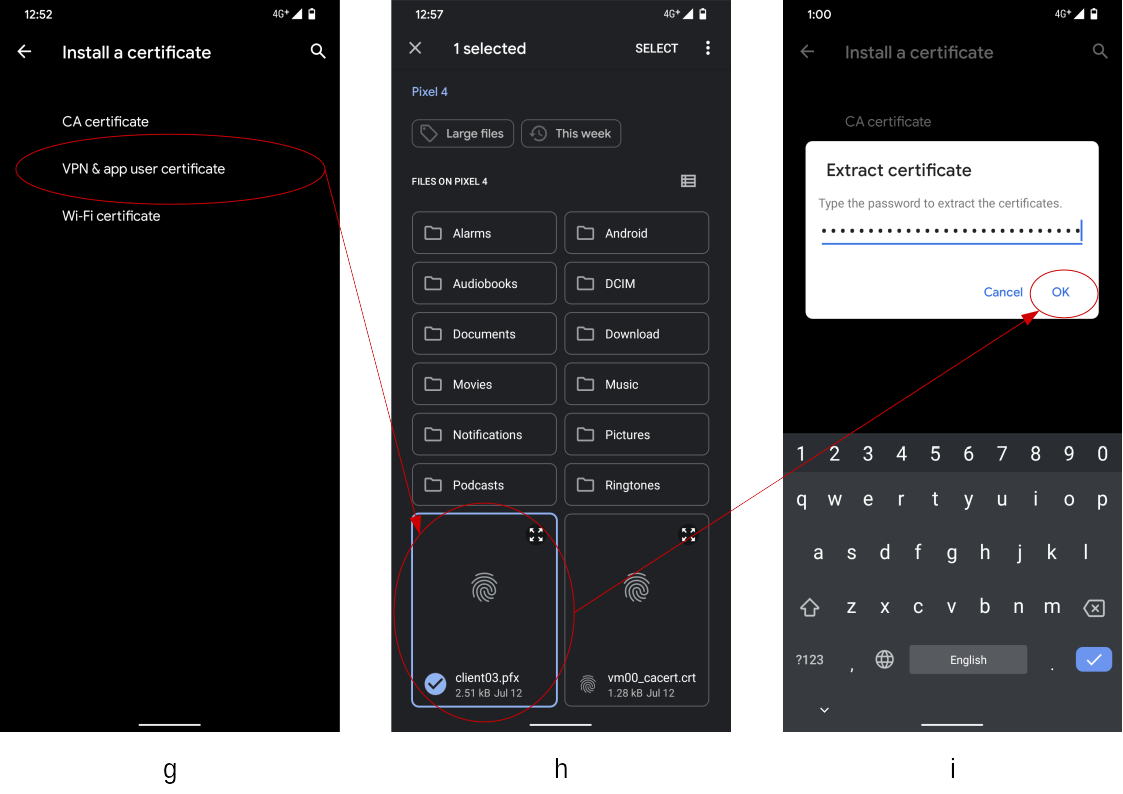
- If you select the item
VPN & app user certificateon the screen (g), you will be redirected to the file selection screen(h), without device authentication. - Select the target certificate file (with a fingerprint icon).
- In this example, select the file
client03.pfxlocated immediate under the root file system. - If you put the target certificate file on a different file system such like SD card or Google Drive, press the burger-icon on the top left corner of the screen (h).
- In this example, select the file
- You will be prompted to enter password to extract the certificate (i).
- Press
OKbutton to finish.
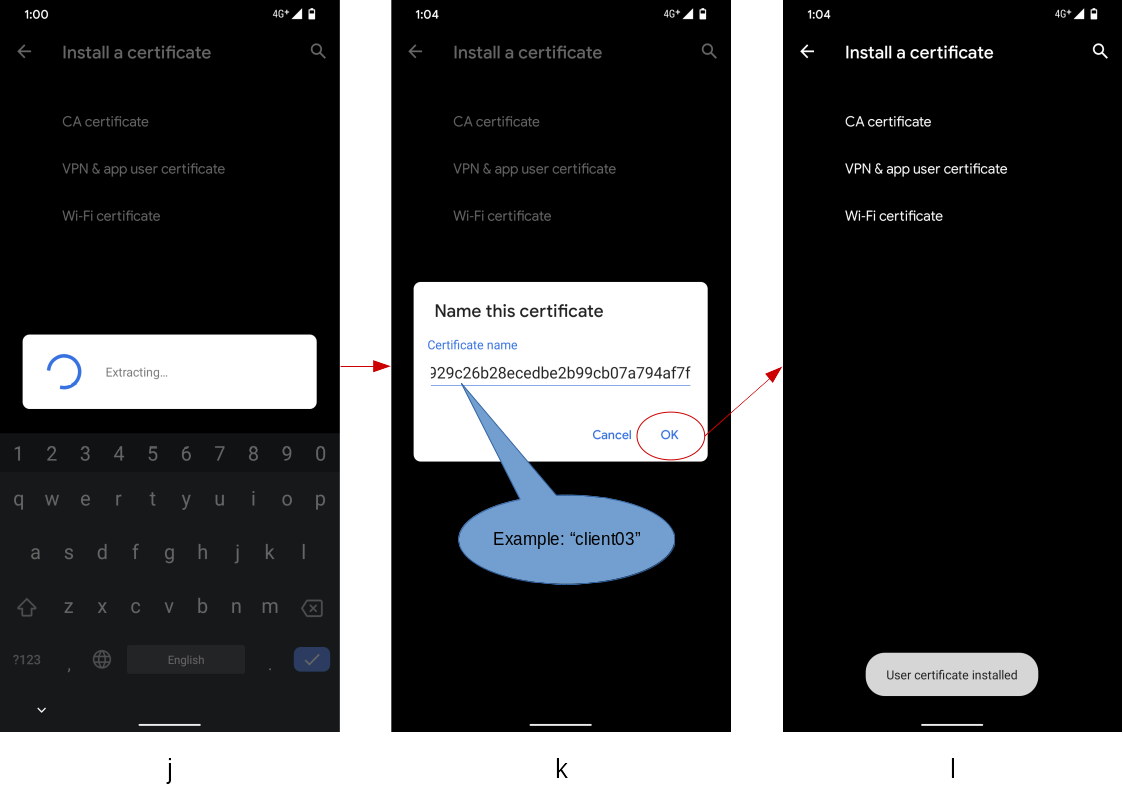
- A progress dialog (j) will be shown while processing the certificates.
- It may take time, around more than several minutes. Beware for a long wait.
- Once the extraction finishes, an dialog (k) which presents an alias
name to distinguish the certificate installed in the system credential
storage.
- The initial value of the alias name has automatically assigned by system as a random hexadecimal string.
- On the dialog (i), rewrite the alias name to a human friendly one
(such like
client03which is the same as the certificate file name). - Press
OKbutton to finish.
- If the installation finished successfully, a toast message will be briefly shown, and you will be redirected to the initial screen (l).
5.4 Check the installed self-signed server certificate
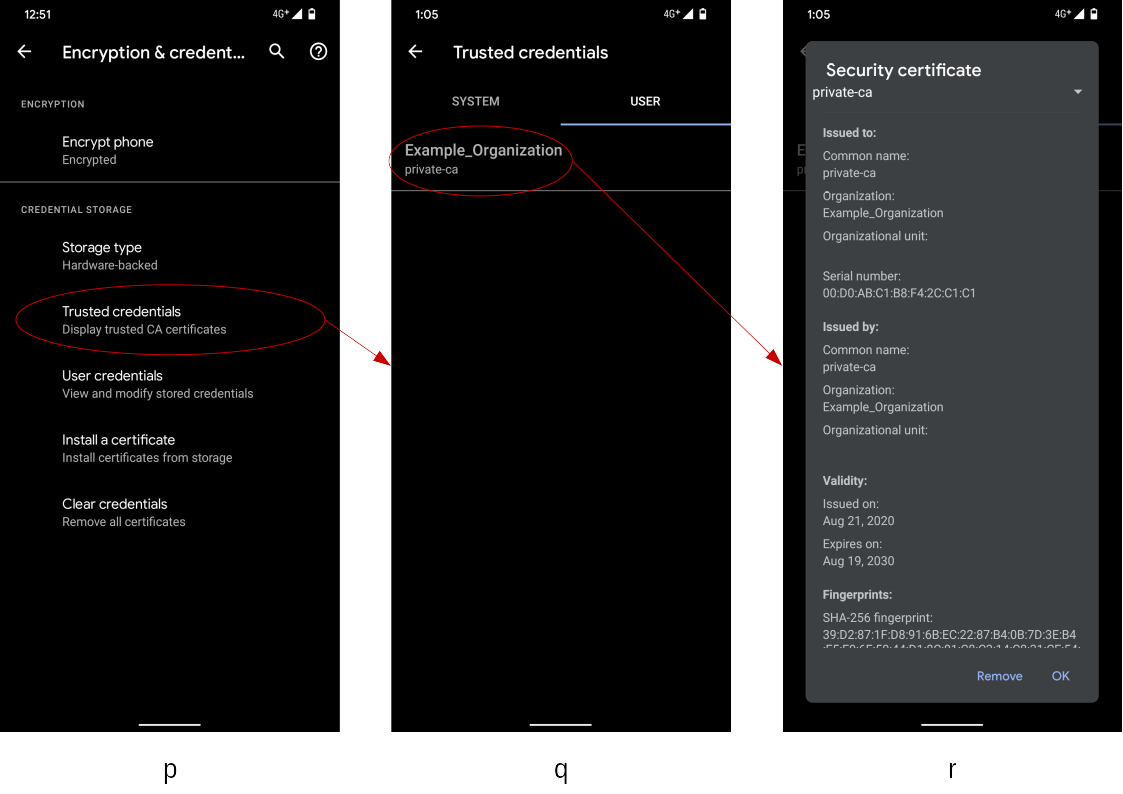
Go through the following steps to check if the self-signed server
certificate has properly installed in the system credential storage
(KeyChain).
- Go back to the certification settings screen (p), and select the
item
Trusted credentials. - In the trusted credential listing screen (q), there are two kinds of
tabs;
SYSTEMandUSER.- The
SYSTEMtab contains public root certificates, and entries are maintained by the Android system. - The
USERtab contains user-managed root certificates, such like a self-signed server certificate described in this document.
- The
- In the screen (q), the
USERtab is empty at initial state, but now you can see a summary of the installed self-signed server certificate. - If you select the item
private-cashown in the screen (q), its certificate details can be seen in a dialog (r).
5.5 Check the installed client certificate
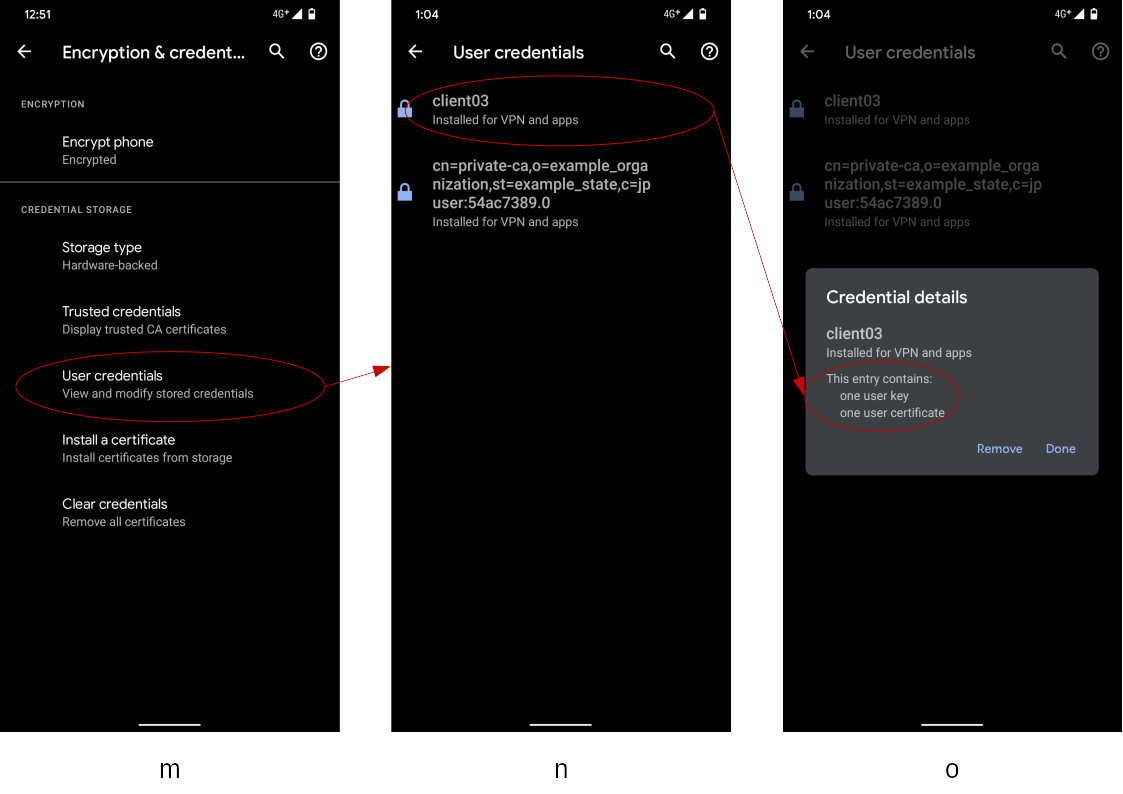
Go through the following steps to check if the client certificate has
properly installed in the system credential storage (KeyChain).
- Go back to the certification settings screen (m), and select the
item
User credentials. - In the user credential listing screen (n), you can see items with
alias name and its purpose.
- The screen (n) is empty at initial state, but now you can see the
installed client certificate (alias name:
client03). - The screen (n) has another item which corresponds to the self-signed server certificate. We will address this later again.
- The screen (n) is empty at initial state, but now you can see the
installed client certificate (alias name:
- If you select the item
client03shown in the screen (n), its credential details can be seen in a dialog (o).
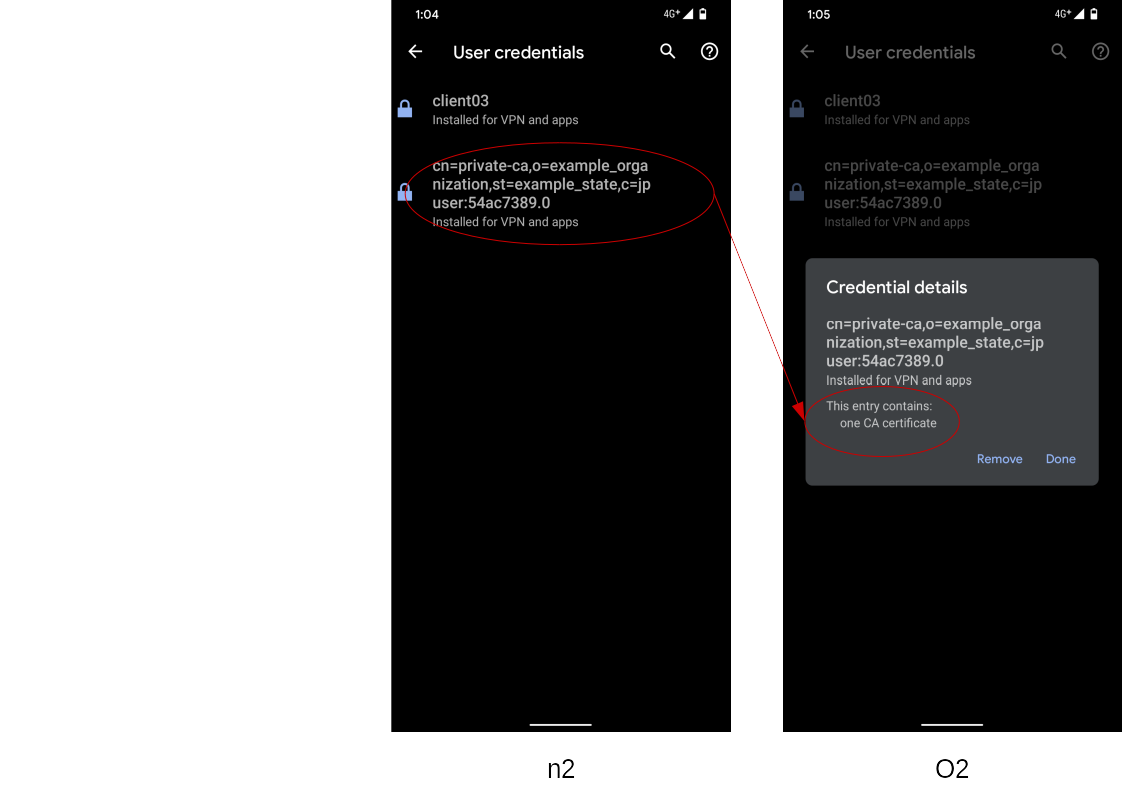
If you select the self-signed server certificate (No alias name) in the screen (n2), its credential details can be seen in a dialog (o2). Check the difference between (o) and (o2), especially in the red circle.